
With potential clients, first impressions are everything. So why not make those early interactions as streamlined and effortless as possible? In my business, I use my HoneyBook SmartFiles proposal template to send contracts, present invoices, and even process payments all in one place. If you want to make your onboarding process as easy as possible (for you and your clients), this is the place to start!
Use my HoneyBook link to start your trial and gain automatic access to my proposal template!
How to Use My HoneyBook Proposal Template (Transcription)
One of the best things I ever did for my business was create templates and automations that saved me hours each and every week.
Hi, I’m Galen. I’m a web designer and I wasted years in my business trying to do everything myself rather than using a tool called a CRM, which is a client or customer relationship management tool.
For way too long, I thought my business wasn’t legit enough to need a CRM. But now looking back, I realize that part of the reason I wasn’t able to grow or scale as quickly as I wanted to because I didn’t have the tools and systems in place to allow for that level of growth. Thankfully, I’ve learned quite a few lessons along the way, and now I’m the biggest believer that every single service provider needs some sort of CRM to keep track of everything going on day to day in their business.
I use a tool called HoneyBook in my business, and it has completely changed the game for me today. We’re specifically going to be talking about how to quickly create proposals inside of HoneyBook from one of my templates.
By the way, if you end up liking what you’re seeing in this video, when it comes to my proposal template, if you sign up via my HoneyBook affiliate link, I’m gonna include the link here. And in the description below, you are going to get instant access to this proposal, right within your HoneyBook account.
Like I said, all you have to do is use my affiliate link. I do get a small commission when you sign up through that link, but you get a free trial and then a discounted rate on the monthly payment. And then you are able to try it out. No strings attached. If you love it, great. If you don’t, don’t worry about it, but either way you will get access to my template within your account right away.
Before HoneyBook, I was using Google Drive to create PDF proposals. I even used Canva for a little while, and then I was using a separate tool to send the contracts to my clients so they could review and then sign online. And then I was using yet another tool to send the invoices so that then my client could send me a check and I would eventually get paid.
Now, with my proposal template inside of HoneyBook, it does all of it for me. I have the proposed list of services. Then, they review the contract and they’re able to e-sign right there and then they’re able to actually pay online. So that way I end up getting paid. Sometimes within an hour or so of actually sending the proposal to the client. I’ll share my screen in just a minute and show you what my proposal actually looks like. But first I wanted to tell you about one of my other favorite features that HoneyBook offers, and that is the communication management between you and your clients.
I don’t know about you, but I have signed up for a lot of email newsletters and what would happen all the time is clients would send me emails and it would get lost in my inbox. Admits newsletters that I had signed up for notifications for apps that I had signed up for. I was just getting so many emails and I only really wanted to focus on the emails that I was getting from existing clients or potential clients to make sure that I was responding in a timely manner. Especially when I would get email inquiries from new leads. I wanted to respond really quickly because in those early days I really needed those new clients. And the faster I responded, the more likely I was to close that client or turn that potential client into an actual client.
I’m embarrassed to say that sometimes I would miss client inquiries altogether because they would just get completely lost in my inbox.
Now, that I have HoneyBook, I am able to keep my client emails in my inbox, but they are also stored in HoneyBook. So, if I only want to see the client communication that I have missed recently, I can go into HoneyBook either on my phone, on the app or on the desktop, in my browser.
I can see what emails I’ve missed. I can respond right from there and I can save as many templates as I need to. So that way I can respond quickly. If it’s a question I’ve gotten before. Okay. So, this is what my template actually looks like inside of HoneyBook. This top section here, it has my logo, and we’ll go into the editor in just a minute. So, you can see how all of this can be customized, but I’ve got my logo at the top. And then I typically have an introduction section here. I would put a picture of me if I had some branding headshots, I could throw in here, I add a headline that just sort of gets people to know me a little bit better. My values as a business owner, maybe I talk about the specific service they’ve inquired. You can customize this as much as you want for each and every client, or just sort of have a boiler point introduction that you use with all of your clients.
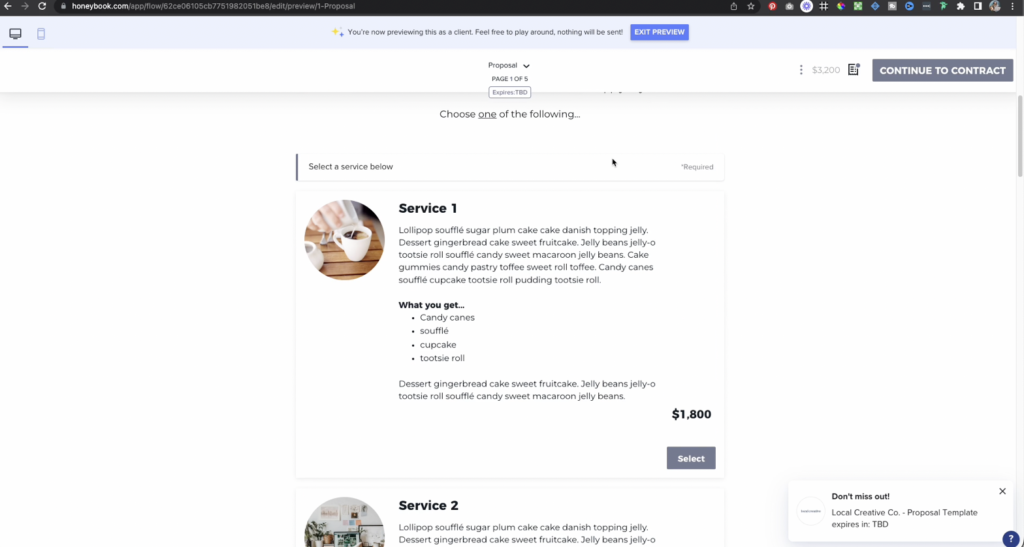
As I scroll down, we dive into the services section. And one of the really cool things about HoneyBook proposals is that they’re interactive. So, you can add your own services here. I’ve got a few just like sample ones here. So that way it’s really easy to add in your own. And clients can either read through or select which ones they’re most interested in. And this section I have choose one of the following selected. So, for this section, they’re only able to choose one. So, for example, they could select the first one, but if they select the second one, it unselect the first one because they can only choose one from this section. So, this is great for, if for a web designer, for example, you could say, well, how many pages is your website?
Is it a two-to-three-page website, a four-to-six-page website? And they could select that option.
You can add in your own images, you can add in your own descriptions, name, each of these services. And sometimes what I’ll do for my clients is on the discovery call. I will know exactly what type of project I’m doing for them. I do design days, meaning that I do all of my websites, typically over a one-, two- or three-day project period.
So, I will know right after the discovery call or the sales call that I have about how long their project’s going to take, because I go into detail about what actually needs to be done during that project, how long I think it’s gonna take. So, I will typically remove the other options and just include one option here based on what I talk to that client about.
But since I know sometimes you want to let the client decide. I thought I would leave in a few different options here. So that way you can either keep them, remove them, or even add more, if that works for you.
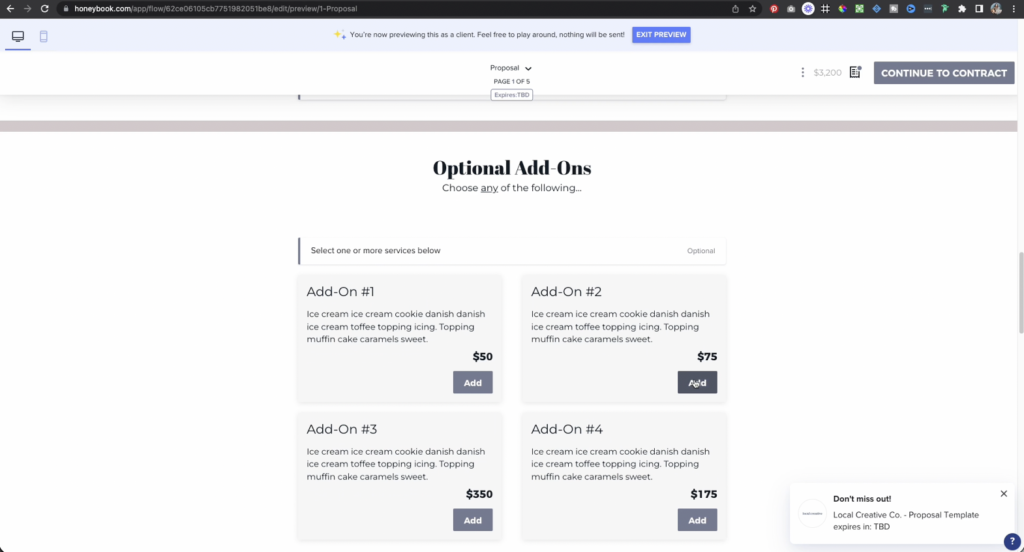
The next section here is my favorite. This is optional add-ons and this section; the clients can actually choose multiple options. They don’t just have to select one. I find my clients absolutely love this. And it’s a great income generator. In addition to the flat rate, I charge for my design days, I will add things like an Instagram link in bio page that I’ll add onto their website, or I might do copy editing, or I might do an additional training call for their website.
There’s a lot of different add-ons you can put in here. So, I just, again, left this blank for now, so you can customize it to make it however you want it to be.
Since I’m in preview mode here, we can actually select these for the purpose of this demo. Then, we’ll move down to the next section. This is my, what to expect section. And it does just that it sets expectations for my clients. So, they know what to expect after they book. What my process is like, it just kind of clears up any uncertainty there might be around the project. Then we have a section here that just sort of talks about my values. I will just add something unique here. It could be specific to their project. It could be something boiler plate that I just use over and over again. It doesn’t really matter. It’s more just to add again, that comfort level. Give my clients that comfort level they need to be able to take that next step with me.
In my proposals. I also like to include some client work examples and some testimonials. I just grabbed these random people’s pictures from Canva and put in some, some text here just for a sample. And then these are just graphics I grabbed from Canva. So, you could put in any graphics that represent your work, that show off your work.
So that way clients can say, wow, this is work they’ve done in the past. This aligns with my project. And a lot of times I will customize these examples based on the style that the potential client told me. They’d like for their website on that initial call.
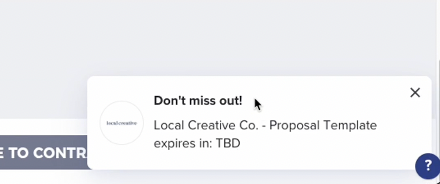
If you scroll down to the bottom, you can see there’s a little pop up here that kind of follows you down the page. This tells you how long they have to view this proposal. Before it expires. You can set a default expiration date, which just gives your clients that little push they need to book with you, and then they can continue on to the contract.
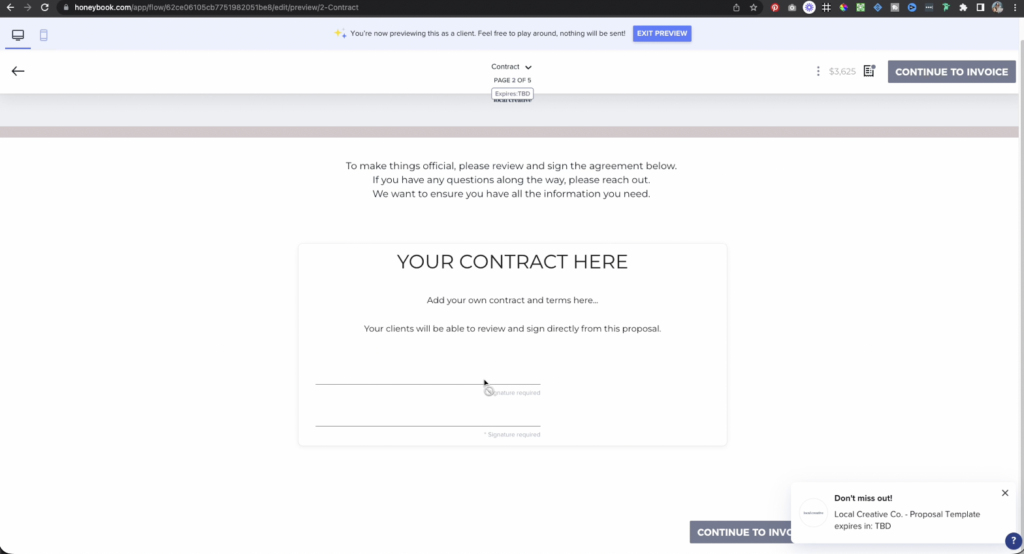
Like I said you can put your contract in here and you can actually have your clients input any information they need. It could be name, address, business, name, all of that. And they can e-sign it. So, it’s a legal e-signature here. You can both sign the contract. You have a legally binding contract. Without having to mail them anything without having to use another third-party tool, it’s all done right here.
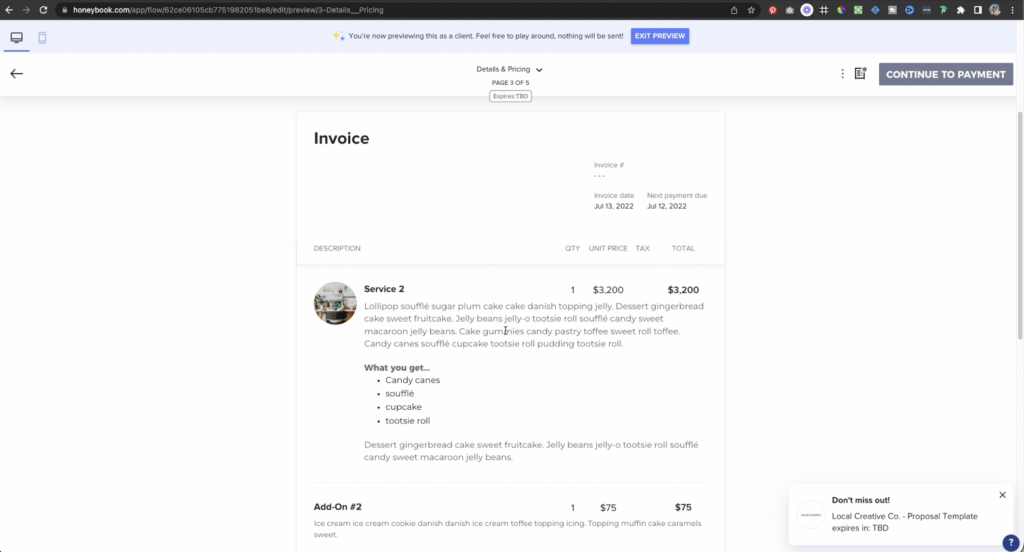
And then the next phase is the invoice. So, this shows your clients what they selected on the first page of the proposal. Everything that you added here, it all gets pulled over any add-ons that they have that gets pulled over to and shows them a total for the project. And then I have it set again; you can customize this.
I have it set typically to do a 50, 50, invoice split. So, I do one invoice. I request 50% upfront before, to book the project or to hold the project. And then 50% at the start of the project because my web design projects have a really quick turnaround time. We get their website done in a matter of days.
So, I do require full payment upfront. So, I offer, or I have 50% upfront, 50% on the day we start the project, and this will automatically be calculated based on the project date you set in your project within the client’s HoneyBook page.
Next, we’ll move on to payment. This is where your client actually enters their credit card information or their bank account information. If you want them to be able to do a bank transfer, you can still accept money via check. You can actually mark an invoice as paid without your client, actually having to enter their credit card information if they prefer to pay via check.
But I love getting paid via credit card or bank transfer because it’s so fast. It’s so easy. And I will always set the pay with auto pay to required in the backend settings of HoneyBook, which I’ll show you in just a minute. I will set that as required because then I know that my client’s gonna pay on time.
I know their credit cards gonna be charged on the dates that we’ve selected in the project payment schedule.
So, once they’ve got their information entered and they hit pay, it’s going to take them to this next step page. And I am all about setting expectations. So, we’re doing that again here to let them know how long it’s gonna be before I reach out before I send them their brand questionnaire or whatever it is, I will put that information here.
You can add a nice picture. You’re gonna customize your logo. Everything is good to go. And they’re all taken care.
Let’s exit out of preview mode and you can see what this looks like in the editor behind the scenes.
Just like preview mode. I am able to navigate back and forth between the different pages of this proposal, but now I’m able to actually go in and edit the different sections. So, you can add your own headline. You can change the font of different elements. You’re even able to add your own fonts, which I really love.
I was able to add my brand font just to really customize it.
You can click the plus sign and add a block. There’s a lot of different types of blocks that you can add, but I really love the ability to add layouts because there are a ton of. Styles and things that you can put in here to, again, show off your work, to describe your values, to put in testimonials, whatever it is.
And then once you have blocks on the page, you’re able to just drag and drop them around to reorder them.
I’ll delete this for now. And then, because again, this was set up for my brand. You’re gonna be able to go in, add your own logo. You’re gonna be able to change the colors of any of the elements on the page and play around with the styling until you get it to match your brand and the look and feel you have for your website, for example, so that everything feels cohesive across the board.
Down here is where you’re going to add in the different names of your services. You can customize this. You’re gonna add in the descriptions. You can change the images. You can reorder these. You can add different sub items for your services. So, say there’s multiple things included in each package. You can list them out here or you can actually add them as different invoice line items.
You can change the pricing. You can change what the button text says. There are so many ways to customize this. I just kind of wanna give you a general idea of what this actually looks like under the hood.
If I click on each one of these images, I’m able to actually replace them. I can even make them a little bit larger by clicking that stretch icon here. That’s gonna give these images, make them fill the space that they’re in. You can replace these images. I tend to go in and just take different screenshots of websites that I’ve worked on.
And again, I put ones in there that I know are going to align with the client that I am trying to impress.
For the contract, you can just come in here and copy and paste your own contract right into this section. And then you are able to add custom fields too. So, you’re able to insert these smart fields. So, you can put in the client’s first name, the client’s last name, the client’s company. You can put in the client’s address, and you can either request that they fill these fields, or you can pull them from the client’s project information if you already have that information stored within HoneyBook.
If I come over to the invoice page, I am able to offer a discount to my clients. I can send recurring invoices or add tax. If you’re selling a product along with your service. Over at the top right of this page, I am able to customize the theme of this template and even apply my company theme that I have in my general HoneyBook settings. And then I can even change the settings for this smart file. One of my favorite options is the ability to add an additional layer of security. I don’t just want anyone opening my project files or my proposal files.
So here I am able to require my client to enter an access code. And what this does is I send them the link. They’re able to click that link and then it will send them an access code. They can enter to make sure that they are the actual person that you want to view the file. Obviously for me, when I use this template, I have all my information already filled in. So, I am able to hop off a sales call with a client. I make a few quick adjustments to the proposal, and I can get it out the door within five or 10 minutes.
HoneyBook will also track the emails that I send directly from the platform. So, if I send a proposal, HoneyBook will tell me, did that potential client open the proposal? And if they haven’t opened it after a few days, HoneyBook will actually send me a quick notification and remind me to follow up with them.
As I mentioned earlier, I’m giving this proposal template away for free. For anyone who signs up for a trial of HoneyBook through my affiliate link, it will be automatically added to your account.
I’ll put the link here and, in the description, below. And if you have any questions about HoneyBook or any of the features that I talked about today, let me know in the comments, make sure to like, and subscribe. Thanks so much for watching and I’ll see you in the next video.
Sign up for HoneyBook today and get 60% off your entire first year using my affiliate link here. This exclusive offer is only available for the month of May 2023. You’ll also get my proposal template automatically added to your account.
Why I Love HoneyBook Proposals & SmartFiles
Even though I’m a web designer, my business hasn’t always been the most tech-forward. Back in the day, I used to send all my proposals, contracts, and invoices via Google Docs. Then, my clients would mail me the signed version and a check for payment. Not only was this system a pain to keep organized, but it also meant that I’d sometimes wait weeks to receive payment.
Then, I discovered HoneyBook! HoneyBook is my favorite CRM (client relationship manager) and the tool I use the most in my business. It allows me to send contracts, process payments, and communicate with clients all in one place. Plus, most of that work can be totally automated.
I spent a long time thinking my business wasn’t “legit” enough to warrant a CRM. Looking back, I wish I would have started sooner! No matter what stage you’re at in your business, you can benefit from a CRM. I can’t recommend HoneyBook enough. Give it a try, and use my HoneyBook SmartFiles proposal template to make setup even easier!
My HoneyBook SmartFiles Proposal Template
Thanks to HoneyBook, my proposal process for new clients is easier than ever! Here’s how I’ve set up my HoneyBook proposal template. (And don’t forget, you can access it yourself when you use my link to start your HoneyBook trial.)
Project Proposal
The bulk of the content in this HoneyBook proposal template lies in this first section. Here, you can include a short introduction to yourself and your business. Then, the client can view your different packages and choose theirs directly in the proposal itself. There’s also space to input several different “add-ons.” These are great ways to increase revenue and share supplementary products and services with your clients.
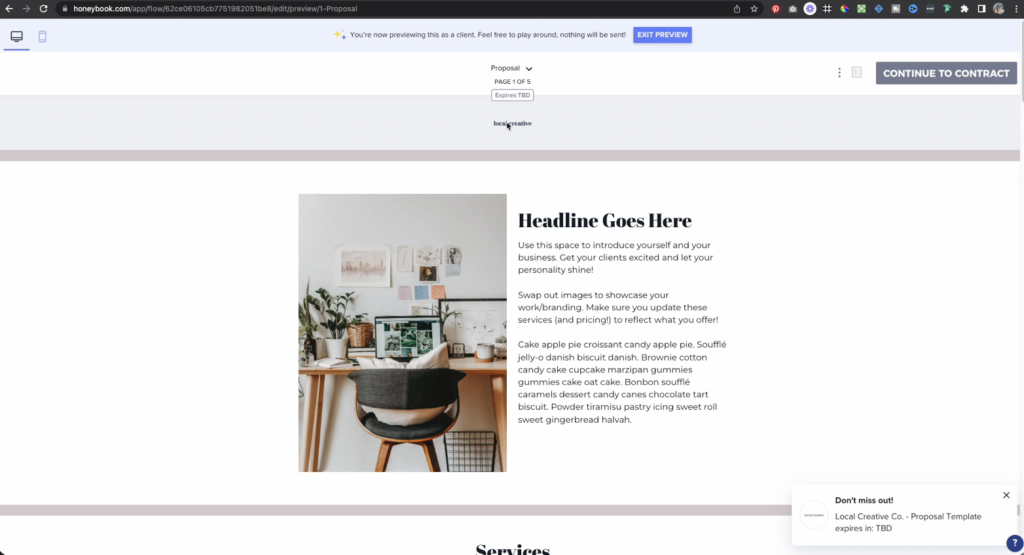
I also use this section to share a bit more about my business, like past projects and client testimonials. This makes the process feel just a touch more professional and helps the client make their buying decision more easily.

Contract
Once they’ve chosen their package in this HoneyBook proposal template, the client is directed to your contract. You can upload your own contract directly into the proposal. You can even include custom fields for your client to fill out, like their name or business address. Once they’re done, you can both e-sign the contract. No more snail mail!
Invoice
Now, it’s time to get paid! Once they sign the contract, the client can pay their invoice via credit card or bank transfer. This allows you to get paid almost immediately. Plus, if your project involves multiple payments, you can set HoneyBook to automatically withdraw those funds from your client’s account. That means no more late payments!
Next Steps
I’m a huge proponent of setting expectations with your clients, and your proposal is a great place to do that! After a client pays their invoice, they’re directed to a “Next Steps” page that outlines…
- when I’ll next be in contact with them
- how they can prepare for our project
- what to do if they have questions or concerns
This way, we’re both on the same page long before the project even kicks off! I highly recommend using this section to set expectations with your own clients.
Additional SmartFiles Features
HoneyBook also offer a few additional features to help you customize your proposals even further. First is the ability to set an expiration date for your proposal. This gives your potential clients a gentle push to book with you.
You can also create an added layer of security by limiting who can view your proposal. When a client clicks the proposal link in their email, they’ll be sent a one-time access code. That way, they can’t share the link with anyone else.
Want to try my HoneyBook proposal template for yourself?
HoneyBook proposals have improved my onboarding process so much, and I know they can do the same for your business. No need to start from scratch, though! Use my link to start your HoneyBook trial, and you’ll automatically gain access to my HoneyBook proposal template!
For even more tips and tricks on running your business efficiently, check out these blog posts…
- How to Embed Your HoneyBook Contact Form on Your Website (Squarespace + Showit Tutorial)
- My Monthly Business Expenses As A Web Designer (+ My Favorite Tools)
- Do These 3 Things Before Starting a Web Design Business
- How to Make Passive Income As a Web Designer

Galen Mooney is the founder of Local Creative, a boutique web design studio crafting elevated websites for small business owners and creatives with a focus on connection, clarity, and growth. With over a decade of experience in design and SEO, she’s partnered with hundreds of creative brands to build custom Showit, Squarespace, and WordPress websites that build trust and momentum over time.
