
Want a quick, easy way to show off your Instagram on your website? Lucky for us, Showit recently rolled out a feature that allows you to embed your Instagram feed onto your website without using a third party app. Here’s how to add your Instagram account directly to Showit in less than five minutes!
If you’re new to Showit, click here to get an extended one month free trial or check out our Showit website templates so you don’t have to start from scratch.
VIDEO TRANSCRIPTION: Connect Instagram to Showit
Hey, there I’m Galen from local creative co. And in today’s video, I’m going to be showing you how to add your Instagram feed to your Showit website.
As you may or may not know. I am a web designer who recently switched my own personal website from Squarespace to Showit. Now, I still love Squarespace and I recommend it for so many of my clients. But I wanted a little bit more flexibility in my own website and I wanted to just honestly try something new. So I switched over to Showit and I’d been having a lot of fun with the platform. Even since I switched my website a few months ago, there have already been a bunch of new updates added to Showit, which is really exciting. And one of them is the ability to add an Instagram feed to your website. That way it always stays up to date with your most recent posts.
Now I do have to say that this feature has been a little bit buggy and my Instagram account gets disconnected quite often, but I found this with pretty much any Instagram integration with any website platform I’ve used in the past. So while not surprising, it is something to keep in mind so that you want to have placeholder images below your Instagram feed. So if for any reason they don’t show up your visitors still have something to look at.
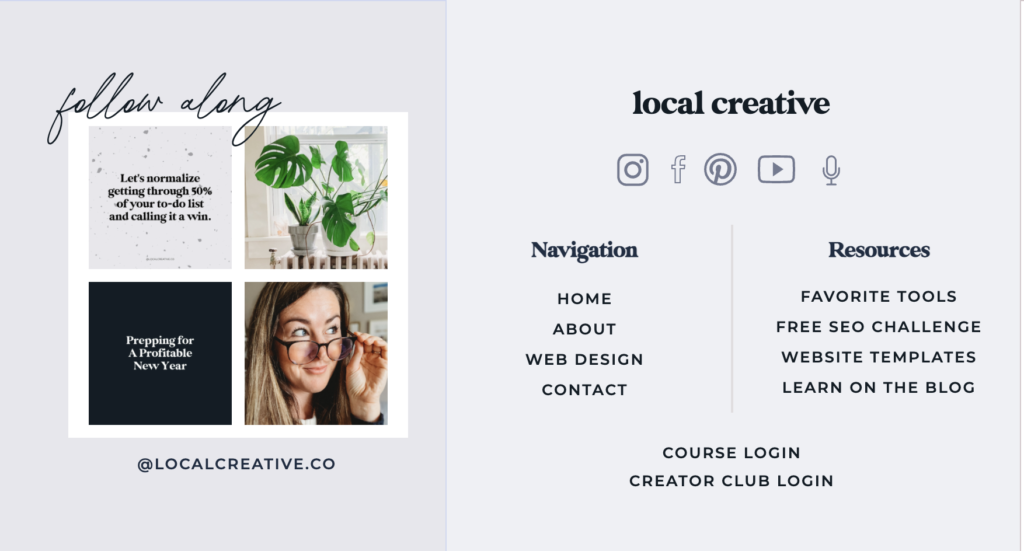
Here’s a quick example of what this looks like on my site. You can see all the way in the footer at the bottom of every pretty much every page on my website. I have this little follow along section here. It’s got my most recent Instagram feed posts, and then it also has a link to go check out my Instagram feed in case somebody wants to follow my account.
Now, if I go to the back, end of Showit. If you’re familiar with Showit, you know, that you have to edit the desktop version and the mobile version of your website separately. That offers a lot of flexibility, but it’s also one extra step you have to take any time. You’re making a change to your website. So, I’m on my homepage here, and then I’ve scrolled all the way down and I’ve opened the footer, which is a site canvas. So that way I can edit this independently of the rest of my website.
You can add an Instagram feed to any part of your website. It can be in its own canvas. It can be in your footer. It can be on any page that you want it to be. So it’s really up to you how you want to place it, but I’m going to show you the basics of this. So that way you can customize it for yourself.
In the past, if you wanted to add your Instagram feed to your Showit website, you had to use a third party tool. Some of them were free and some you had to pay for, so I love that they added this as a built-in feature to the platform.
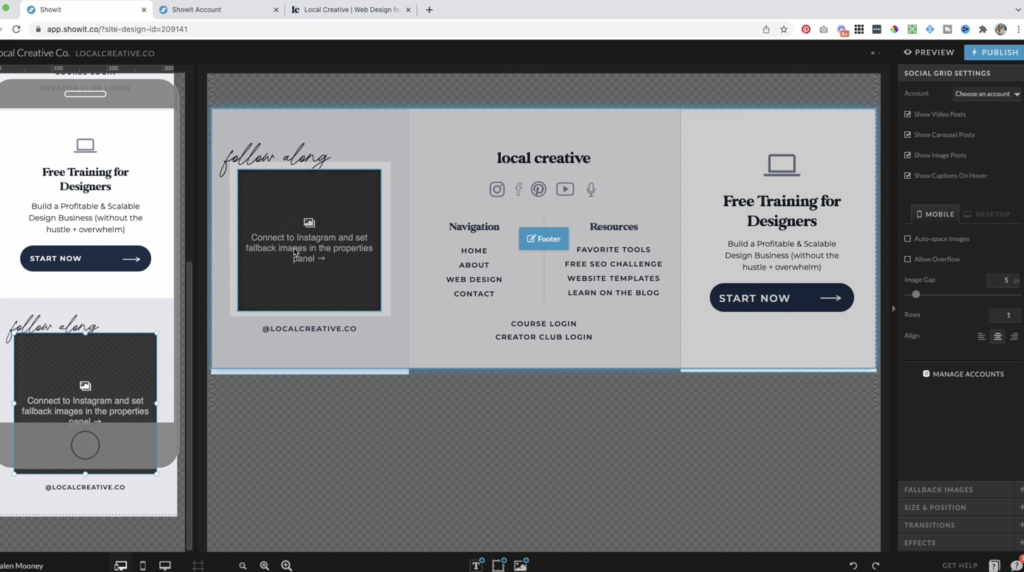
I’m going to come down to the bottom of the page here where I can select an object to add to the page and all the way at the bottom here, you can see social grid. I’m going to click that and it automatically creates a blank social grid for my website. Now, I already had this created for my website because I’ve set it up before, but I’m going to show you how to set this up for yourself from scratch. The first thing I’m going to do is resize this block to fit where I want it to go. And I can just adjust this in Showit. This is one of the coolest things about Showit as you can just resize any object and it is going to scale as the page scales. And then you, again, you do have to design this separately for mobile. So I am going to move this around on mobile as well.
There we go. And I might adjust that in a little bit. And then once you have it looking the way you want it to, you have it in the spot that you want it to you can go over to your canvas settings and you can move this block. Like, for example, for me, I want this block to fall below the word follow along. So that way the text sort of overlays on top of the, uh, social images. Once they pop up.
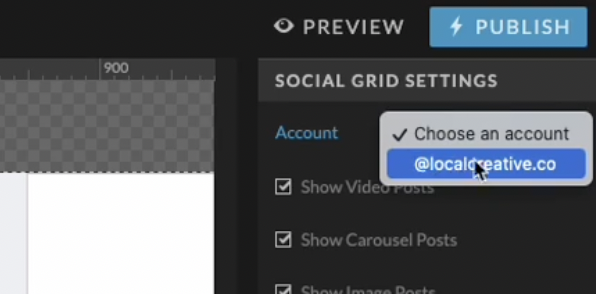
Now that I have everything looking good. I am going to go over to the settings here on the right. And I have already connected my Instagram account here, but if you have not connected it, it is going to give you a button here where you can set up your account. And what that’s going to do is it’s going to bring you to a page like this, where you can connect your Instagram account.
Ideally, you want to already be logged into Instagram on your computer in another tab. So when you hit connect Instagram, it’s going to pull that login information and it’s going to automatically sync your social images or your Instagram posts with your show at website. So mine’s already connected. So I’m just going to select my Instagram account here.
And now is the fun part. Now I get to change my settings and decide exactly how I want this to look. So first I’m going to choose how many rows that. I want to have, and in my case, I want to have two rows. I might play around with the image gap a little bit, or how much space is going to be showing up between the images. Again, don’t forget that you have to edit this separately for desktop and mobile. So for mobile, I’m going to, again, set it to two rows there and I’m going to adjust the space a little bit. I get it looking exactly how I want it to, and once that’s looking good, you can check out these options over here. You could have it. Show video posts, carousel posts, image posts, and show captions. I actually don’t want it to show the caption on hover. I’d rather have somebody click over to Instagram to read those captions.
Another really cool feature that you definitely want to take advantage of is these fall back images here. As I mentioned, your Instagram connection becomes disconnected pretty easily and that’s completely normal. Uh, ideally that will get fixed at some point, but I’ve just found that any type of social integration is a little bit finicky, so you can add fallback images. So that way, if for some reason your Instagram account ever gets disconnected, you’ll still have images showing up in their place. So that way your feed never looks empty.
So you can add your own fallback images here. You’ve got your regular size and per, uh, size and position settings, just like every other show at block that you can add. Um, and that’s it pretty straight. Great forward. I absolutely love this feature and I am so glad that show it added this. They listened to their users is a really exciting update for the platform.
Let me know if you knew about this feature. If you’re going to implement it after this video, I would love to hear it from you in the comments.
If you want more show at tutorials, let me know what you want to learn more about, and I can’t wait to create them for you. Thanks so much for watching and I’ll see you in the next video.
How to Add Your Instagram Feed to Showit
STEP 1: Open the page you want your feed to show up on.
I typically include a social feed in the footer of a website, but you can put yours anywhere. Open the page you want to edit or the footer canvas, and be sure to also open the mobile version so you can edit them both.
STEP 2: Add a social grid block.
Click the icon at the bottom of the screen to add an object to the canvas, and select SOCIAL GRID. Then, resize and position the block to fit on both your desktop and mobile canvases.
STEP 3: Connect your Instagram Account.
Select the block, go to SETTINGS, and click the button to connect your instagram account. You’ll be redirected to a page to give Showit permission to access your Instagram feed.
STEP 4: Customize the look of your social grid block.
Under SETTINGS, customize the size, spacing, and number of images in your social block. Do this for both the desktop and mobile versions of your site.
STEP 5: Add fallback images.
For both the desktop and mobile social grid blocks, scroll to the bottom of SETTINGS and select FALLBACK IMAGES. Here, you can upload images to appear in the grid should your Instagram account ever get disconnected from Showit.
Since this new feature is a bit buggy, I suggest doing this before publishing your changes.
STEP 6: Publish!
Now, the social feed block on your website will automatically update itself whenever you post on Instagram!
Want to learn how to design a beautiful, functional Showit website?
Here are a few more posts you may want to checkout next…
Why You Shouldn’t Use Canva for Your ‘Link in Bio’ (Do This Instead!)
How to Embed Your HoneyBook Contact Form on Your Website (Squarespace + Showit Tutorial)

Galen Mooney is the founder of Local Creative, a boutique web design studio crafting elevated websites for small business owners and creatives with a focus on connection, clarity, and growth. With over a decade of experience in design and SEO, she’s partnered with hundreds of creative brands to build custom Showit, Squarespace, and WordPress websites that build trust and momentum over time.
