
I have all the juicy details to a YouTube setup for beginners because I lived it. My journey with YouTube started way back in 2016. I bought fancy lights, a backdrop, and a microphone that I can’t even find anymore. All with the goal of starting my own YouTube channel and creating videos to help all my fellow business owners.
But here’s the truth: video creation is hard! It takes time to come up with topics. And energy to to produce each video. The last thing I needed was a difficult and time-consuming setup.
Transcription: My Lazy YouTube Setup
I’m not going to lie. I put off making this video for quite a while because I feel like my office isn’t really done, but I’ve been getting so many questions about my YouTube setup and what my setup is like. And I think it’s actually going to be kind of fun to share, because I would say my YouTube setup is kind of like the lazy person’s YouTube setup in that I never take it down. It’s just up 100% of the time. So when I’m ready to sit down and record, my setup is good to go. And all I have to do is turn my camera on.
The reason I have it set up this way is because I am not a full-time YouTuber. I am a web designer who happens to also make YouTube videos, although I did just get monetized, which is really exciting and I’ll share that in another video. If you’re interested comment below and let me know, because I would love to make that one next.
So basically I wanted to be able to create videos consistently without spending hours putting up and taking down my setup each and every time.
I had goals of starting this YouTube channel back in 2016. I remember because I can look back at my Amazon purchase history and actually see the exact date that I went through and purchased the light setup that I have now, a backdrop that I don’t use because now I just use my office. But I bought some fancy backdrop, a fancy backdrop holder. I bought a microphone that I think I lost at this point. I don’t even know where it is and I bought this lighting setup, which I’ll show you in just a second. I now only use one of the two lights that it came with, but I find that they’re still great even years later.
But the point is I bought all this stuff back in 2016 and then didn’t actually really start my YouTube channel until the beginning of 2021.
And the reason for that is that video creation is hard. It takes a lot of energy to produce the videos. It takes a lot of time to think about the topics. And the last thing I wanted to do was stress about the setup, but I’m a perfectionist, so I also wanted a setup that looks pretty good.
Prior to 2021, I had created maybe four or five YouTube videos on my channel. I published and just left them there. They never really got any traction. And I knew that if I wanted to commit to YouTube and really see success with it, I had to post more consistently. So in 2021, I decided that I was going to post a new video every other week, twice a month.
And even though all the YouTube gurus tell you that you need to post multiple times a week to be successful, I was okay with it taking a little bit longer for me to see results from my YouTube channel if the schedule that I was creating for myself was doable for me.
I had to keep in mind that I was also a business owner and my business came first. So I had to take care of my web design clients, marketing my web design business before I thought about YouTube. And I found ways to schedule it into my week without it putting too much pressure on me to create content.
I should also mention that I hired a contractor to help me with parts of my YouTube channel. I did everything myself at first, and then I realized that where I was falling short was actually getting the YouTube videos uploaded to YouTube, getting the titles and descriptions written, getting the thumbnails created. And then I also write a blog post for each and every YouTube video that I publish or almost every YouTube video that I publish. So I really outsourced that writing piece because that was the bottleneck that was keeping me stuck.
Then closer to the end of 2021, I actually was able to outsource my video editing or at least that first run through of the video edit, because that also takes quite a bit of time.
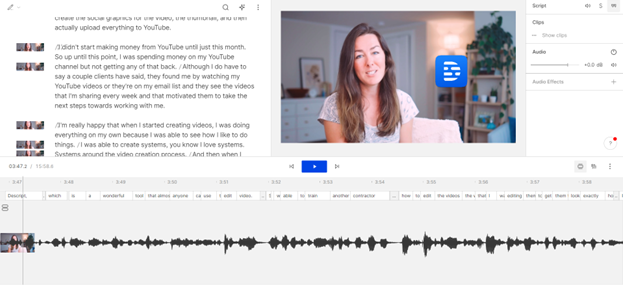
If you didn’t watch my previous video, I use a video editing tool called Descript, which is a wonderful tool that almost anyone can use to edit video. So I was able to train another contractor how to edit the videos the way that I was editing them to get them to look exactly how I wanted.
So by the end of 2021, I was coming up with the video topic, I was typically writing the SEO-friendly title that I wanted to use for that video. I would then sit down and record pretty much in one take the entire video, and then I would pass it off to my video editor who would trim all the good parts down, delete all the parts that we wanted to get rid of, and then she would pass it off to my copywriter who would write a blog post for the video, who would create the social graphics for the video, the thumbnail, and then actually upload everything to YouTube.
I didn’t start making money from YouTube until just this month. So up until this point, I was spending money on my YouTube channel but not getting any of that back. Although I do have to say a couple clients have said, they found me by watching my YouTube videos or they’re on my email list and they see the videos that I’m sharing every week and that motivated them to take the next steps towards working with me.
I’m really happy that when I started creating videos, I was doing everything on my own because I was able to see how I like to do things. I was able to create systems, you know I love systems. Systems around the video creation process. And then when I went to go outsource that, it was much easier to have an idea of how much time I could expect it to take somebody else to do the same things that I was doing and exactly how I wanted them to do those tasks step by step.
Even now that I’m monetized, I am definitely not making enough from a YouTube Adsense to cover the contractors that I had hired to help me get those YouTube videos out the door. But I do think I am making more than the average new YouTuber does when they first get monetized. And there’s a few reasons for that that I’ll share in that monetization video. So again, let me know in the comments if you want to learn more about that process and what the journey looked like for me.
Next, I’m going to give you a little tour of my home office and show you where I have my camera and lights placed to get the type of video that you’re seeing right now. But before we jump into that, I wanted to let you know that all of the camera equipment I use, all of the lights and the tech equipment, as well as the tools I use to edit these videos are linked in the description below if you want to check them out.
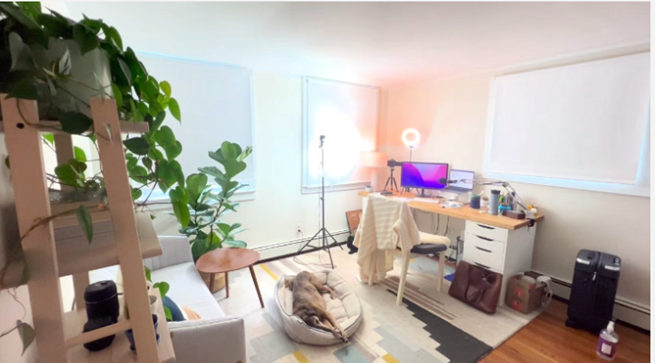
Okay, so here’s my home office tour. Ignore the mess on the right side of the room. You can see there’s my backdrop. I’ve got a light in there. A vacuum cleaner that’s not in the video. Then here is my office setup. This is Lila. She is sitting behind me right now. She usually stays very quiet behind my videos. Although occasionally I have to nudge her to stop snoring.
For my lighting setup I use two main lights and then I also have a desk light on the table just to give us a little more light. One main light on my left, one on my right- that’s a desktop ring light. And then I have my camera placed strategically between the two. So I’ve got lights on either side and a camera in the middle. And this just, again, really creates that nice even light.
You’ll also notice that I pulled the shades down in my office because I really want to control the light. I don’t want the outdoor light to change and that to change how everything looks in my video. So pulling the shades down really just keeps it consistent. So I could record at night. I could record in full sun during the day and my office always looks the same.
I should also mention that a lot of times I will have another light placed off to the right side here, behind my head. I will have it shining up at my hair. I think this is sometimes called a hairlight. It’s placed out of frame, so you can’t see it, but it just helps to kind of separate me from the background of the video and create kind of a professional look.
I’m currently filming this video on the Canon EOSR. I love this camera. It’s pretty new to me. Although it’s been out for a few years now. It is a Canon mirrorless camera, and I love it because it’s got the flip out screen. It has great auto-focus so as I move closer to the video or further away, the auto-focus adjusts seamlessly.
I also love that I can shoot in 1080p or 4K, although the 4K does have a crop. Typically I just film in 1080p, upload it to my video editing software, and then I’ll actually export it at 4K so that way it just shows up better on YouTube. Not sure why. But I’m able to export that in 4k, upload to YouTube, and YouTube seems to like that footage better.
As I mentioned, all of the camera equipment, lighting equipment, everything is going to be linked in the description below, so you can create a similar setup for yourself.
Next, I wanna talk about something that’s kind of unique that I think I do as a video creator that a lot of other people might not think about. But I will record my video and my audio from two separate sources. My audio is from a microphone that I have just off screen here. It’s plugged into my computer. My camera is straight ahead of me. That is also plugged into my computer and I record directly to my computer. So that way everything, the audio, the video’s already synced and saved on my computer from the moment I finish recording. And that makes the editing process so much easier. Let me share my screen with you and I will show you exactly what I’m talking about.
So here is what my computer looks like while I’m recording. I record into a piece of software called Ecamm Live, and Ecamm Live was originally created to help people go live. So to help you go live on Facebook groups or YouTube or wherever else, with a more quality streaming setup where you can add graphics on the screen, you can go live with a high-quality video source other than your regular computer’s camera, right? So pretty cool. But instead of going live using Ecamm Live, I use it to record directly to my computer. And this way I can actually see my video as I’m recording and I’m able to make little tweaks.
So let’s see if I can show you this. I can change, for example, the brightness of my video and I wanna make sure I put this back so it stays exactly where it was. I could change the temperature of my video. There we go. You can kind of see how that changes. So I can really change a lot of the settings here. I’m sorry I’m squinting to see if I can get it right back. I think it was at 11 before.
And then if I scroll down here, I’m actually able to upload a LUT, which is a way to customize footage that’s typically added in post. It’s a method of color-grading your footage. It’s typically added in the editing process, but I add it on the front end and record with my LUT already added. I record with my color settings already done. I am filming in what’s called C-Log
this is definitely not required. I went down a YouTube rabbit hole when I was learning how to set all of this up. And got really fancy and custom with how I do all of this but you don’t need to have custom color-grading or anything like that.
But I do love recording into Ecamm Live because I can A. See myself really large so that way I can make any color adjustments, lighting adjustments ahead of time versus that small little screen on my camera.
Once I have all of that set, I make sure that I am selecting the proper mic. So currently I am recording with my ATR USB microphone. I can see that I’ve been recording for 30 minutes at this point. And after this is edited down, this is probably gonna be about a 15 minute video. So there’s a lot that gets edited out. I can choose my camera. I can go back and forth between my, here we go.
This is my straight out of my computer. This is my computer camera. Or I can switch back to my Canon EOSR, which clearly is a much better video quality. If I wanted to, I could add things on my screen, I could screenshare. There’s a lot of cool things you can do.
The next thing that I do is I use Descript, which I will have linked below as well, so you can check that out. I use Descript and I have it record and transcribe as I’m talking because I mess up a lot when I create these videos and I like to know where I left off or how I started the last sentence that I might want to redo because I didn’t do it great the first time, or I stumbled across my words, whatever it is. I like to be able to see what the last thing I said was. It makes starting over a particular section so, so much easier.
So I just have this record, the audio, and I have it transcribe as I’m recording the video all in one take, knowing that I’m going to make a lot of mistakes and this will make picking up where I left off a million times easier.
The next thing I use to create my videos or as I’m creating my videos is Notion. I have a Notion content calendar set up, which let me know. I think I might have a video about this one, but I would love create one. So if you wanna see that, let me know Uh, in the comments below, I’ll be happy to make a video about this too.
But I have a content plan set up and here’s where I have the title for my video, the month that it’s going to go live. And I can include my notes here, any key takeaways from the video. This one was pretty bare bones cause I kind of knew what I wanted to talk about. These are obviously not fully scripted videos. I’ll put the video description in here for YouTube. And yeah, it just helps me kind of stay on track, make sure I mention all the things that I plan to talk about when I hit that record button and just keeps me organized in general.
The last thing that I use to record my videos is Loom. I can’t click it right now, but I have the Loom Desktop extension currently recording. I have it recording for the full length of my YouTube video or of the Ecamm Live video. I have it recording the audio. So I will sync up the audio from my screen recording in Loom with the audio from my computer for my talking head video, and make sure that you see my screen at the same time that I am seeing it on my end when I record it live.
The only thing I did record ahead of time was that office walkthrough video. I didn’t record that live. I recorded that before this video with my iPhone, just so you could get a tour of my office.
I hope you found that super helpful. I know it was a lot to cover. If you have any specific questions, I’d be happy to make a separate video about anything in my editing process. I did make one video about my Descript editing process already that you can go ahead and check out, but it was a lot. I hope that you watch this video and think about what could you do that was maybe the minimum viable product for your own videos. It doesn’t have to be super complex. My favorite part about my setup is all of this stays up all the time. So when I go to record a video, I turn on the lights, I pull down the shades, I make sure I have my mic just out of frame so you can’t see it and I hit record. That’s it. I’m ready to go. I might adjust the colors a little bit if my setup is a little bit darker today or a little bit later than normal, but that’s it. I am pretty much ready to record, and it makes it super fast and super simple to get started.
I think I forgot to introduce myself when this video started. So, hi, nice to meet you. I’m Galen And if you enjoyed this video, make sure to like and subscribe so you don’t miss anything I put out in the future. Thanks for watching and I’ll see you next time.
Getting Started on YouTube and Staying Consistent
So after 5 years of inconsistently creating videos, I decided in 2021 that I would create a schedule. Even though all the YouTube gurus say you need to post several videos a week, I decided on two videos a month. Here’s my advice: create a schedule that’s doable for you so you stay consistent. I’m not a full-time YouTuber- I’m a web designer. So as a business owner, I have to focus on client work and marketing my business before thinking about YouTube. It’s safe to say I need all the time-saving I can get when it comes to video creation.
That’s why I created my lazy person’s YouTube setup that’s simple, yet professional. And the best part? It stays up all the time! All I have to do is turn my camera on.
Another way I helped my YouTube efforts is by eventually hiring contractors. Where I was getting stuck was writing the titles and descriptions, and the blog post that I create for each YouTube video. I also outsourced the video editing because that can take a lot of time as well.
If you’d like another video about that, let me know in the comments.
I didn’t start making money from YouTube until August 2022. So up until that point I was spending money on having my channel, but not getting any of it back. However, I did have clients who found me through my YouTube channel which is awesome. This is where consistency pays off so I’m glad I stuck with my schedule and get to make money as a beginner YouTuber.
Best Tools and Camera Equipment for YouTube Beginners
I’m about to dive into a lot of tools and equipment I use as a “lazy” (aka part-time) YouTuber. Although I do make money from my channel now, I didn’t always and I needed a setup that I could leave up all the time meaning I could go from idea to hitting record in a matter of minutes rather than wasting time putting up and taking down lights.
Keep reading to learn which camera I use, what my lighting setup looks like, and what tools I recommend for editing and recording your videos.
My Simple YouTube Camera & Lighting Setup
The camera I use and love is the Canon EOSR. It has a flip-out screen so I can always make sure I’m placed where I want in the video, as well as auto-focus that adjusts seamlessly as I move around in my recording. It can record in 1080p or 4K. I typically record in 1080p and export in 4k to save space on my computer.
Another thing I do that is a bit unique is record my video and audio from two separate sources. I use an ATR microphone to record audio, and my camera to record video. Both are plugged into my computer so the audio and video are perfectly synced. This makes the editing process so much easier. Most built-in microphones aren’t great, even on really nice cameras, and it’s important to use professional quality audio.
I’ve added everything from my YouTube setup to my Amazon storefront linked here.
Please know that these are affiliate links and I do receive a small commission for any products you purchase after clicking. Thanks in advance for your support of this blog!
Lights, Camera, Action!
You can see my exact office setup in my YouTube video, but basically I have two main lights- one on my right and one on my left, with my camera in-between the two. I use a simple desktop ring light to save space and a secondary larger umbrella light next to my camera.
I also have my shades down so I am always in control of the light in my office.
You want bright, but soft diffused light so not to create harsh shadows on your face.
My Simple Video Recording/Editing Process
I record into a software called Ecamm Live. This allows for a high-quality video source and also lets you add graphics over your video. I can see my video as I’m recording so I can make little tweaks as I go including brightness and temperature settings.
Ecamm Live allows you to add a LUT, which is typically added in post to color grade footage. I film in C Log and color grade with a custom LUT, but don’t worry if this is like a foreign language to you. I went down a YouTube rabbit hole and got pretty fancy, but it’s completely not necessary.
I record my videos in one take, knowing I’m going to make mistakes and that’s okay! Descript transcribes my audio as I record so I know exactly where I left off if I need to start again. Descript is also the video editing tool I use to clean out any outtakes, bloopers, or long pauses — there’s a lot of them!
It is a wonderful tool that is pretty easy to learn from scratch (and they have awesome tutorial videos too). I have a video all about how I edit my videos with Descript that goes into more detail.
For recording my computer screen, I use Loom but this can also be done directly in Descript.
The last tool I use for my YouTube setup is Notion. I create a content plan in Notion for each video so I can outline all my thoughts before hitting record. I include the title, the month it will go live, and any notes and key takeaways. This helps me stay organized and on track so I know which videos are going live each month.
YouTube Setup for Beginners
Is this the easiest setup for beginner YouTubers? It depends. Only you will know what the right setup is for you and I hope this video and blog post serves as inspiration. I’ve been doing this for over a year now and I love that I can sit down and start recording in less than 5 minutes.
It’s a great setup for someone that wants to look professional and doesn’t want to spend a ton of time prepping their space before filming each and every time.
The tools I use really help me streamline the recording and editing process so you don’t have to be a professional videographer or editor to create high quality videos from the comfort of your home or office.

Galen Mooney is the founder of Local Creative, a boutique web design studio crafting elevated websites for small business owners and creatives with a focus on connection, clarity, and growth. With over a decade of experience in design and SEO, she’s partnered with hundreds of creative brands to build custom Showit, Squarespace, and WordPress websites that build trust and momentum over time.
