
If you know me, you know I organize my entire life in Notion. It’s my go-to tool for creating to-do lists, both business and personal. And with so much room for customization, there are endless ways to set up your daily, weekly, and monthly schedules whether you’re a newbie or you’ve been using Notion for ages.
For more Notion resources, check out how to create a content calendar in Notion.
3 Ways to Make Your Notion To-Do List
Whether you’re brand new to the platform or you’re a Notion pro, you have total control over the look and feel of your Notion to-do list. Here are three simple tutorials for Notion beginners and pros.
❤️ Love Notion, but don’t love setting it all up for the first time?
Purchase my super simple Notion to-do list templates (and if you want all my dashboard templates you can add them after checkout). Grab 50% with the code BLOG for a limited time by clicking here.
Want more videos like this one? Click here to subscribe on YouTube.
Video Transcription: 3 Ways to Create a To-Do List in Notion
Welcome back to another video today. I want to talk to you all about my favorite productivity tool, Notion. Now, I’ve used a lot of different productivity tools, everything from Trello to Asana, to just a pen and paper, and while I still do love a pen and paper every once in a while, I rely solely on an app called Notion to run my business life and my personal life. Today, I’m specifically going to be talking about to-do lists in Notion and how you can create three different types of to-do lists or three different styles of to-do lists, depending on how tech savvy you are, how advanced you are of a Notion user.
We’re going to start from something really, really basic, and then move up to something a little more advanced as we go.
Before we dive into today’s video. I wanted to tell you about a recent video, I made all about my Notion content calendar set up. If you’re an advanced user, it’s definitely something you can create yourself. It’s pretty cool how I have everything set up and interconnected. And if you’re just starting out and you want to just take all my templates and use them for yourself, you can join my membership, the Creator Club.
I’ll add a link around this video, and to that other video. So, you can go check it out and to the Creator Club membership. If you want to learn more about it.
I think one of my favorite things about Notion is that when you open a new page in Notion, it’s completely blank and you can do whatever you want with it. You can write on it just like you would a Google Doc, or you can fill it in with tables and make it more of a complex system.
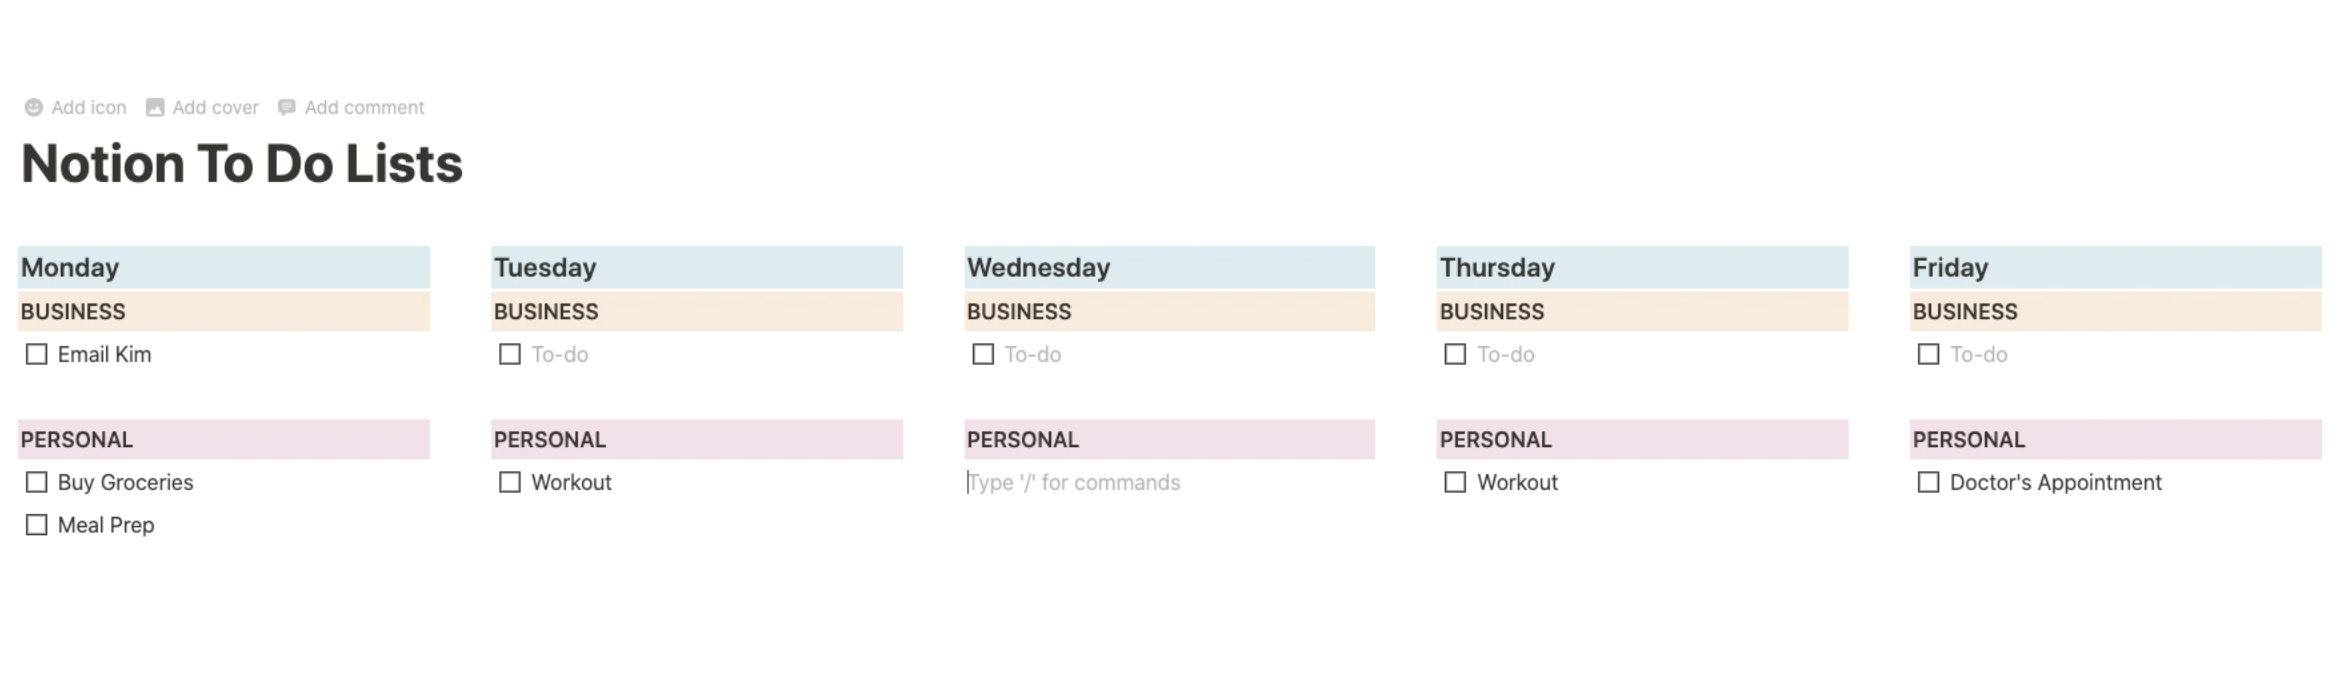
The first type of to-do list we’re going to set up, it’s just a really basic Monday through Friday checklist where you can move different tasks around, add them really easily to your schedule and check them off as you complete them.
I’m going to start first by just typing out Monday through Friday.
Next, I’m dragging them all side by side so I can create this really nice Monday through Friday view. And actually, what I’m going to do here is I’m going to create this as a full width page. So that way I have a much wider space to work with. Then, just because I like color I’m going to go ahead and turn all of these a different color. So, it’s kind of more fun to look at. You can customize any text in Notion by highlighting it and then clicking on these little dots next to it. And then for these ones, I’m going to turn them into an H 3. So, they’re just a little bit bigger and they stand out on the page.
Now, we get to add our checklist items. So, I’m going to go ahead and add in a checklist, and I’ll show you how easy it is to add new items to your to-do list and to drag them between different days.
I’ll use the forward slash to open up the command’s menu, and then I’m going to start typing to-do, to get those checkboxes, to pop up.
Now you can start adding in your to-do list items and I’ll show you how easy it is to drag them from one day to the next. Another cool thing you could do is break these down into business and personal tasks if you want it to. You can create a header for business, a header for personal, and then just drag the checklist items under each one.
Now, if I like this layout, I’m going to select it, copy it and paste it under each day so that I have them all looking the same. There you have it as super simple Notion to-do list. The only downside to this type of to-do list is that it doesn’t let you take advantage of Notion databases, which allow you to check items off your list and move them to a different list or filter them by certain properties. I’m going to show you that type of to-do list in just a second.
To create a to-do list, using a database inside of Notion. I’m going to enter down a few lines below my earlier one, hit that forward slash and start typing table.
Then, I’m going to choose inline at table as my option. And I’m going to name this table To-Do List.
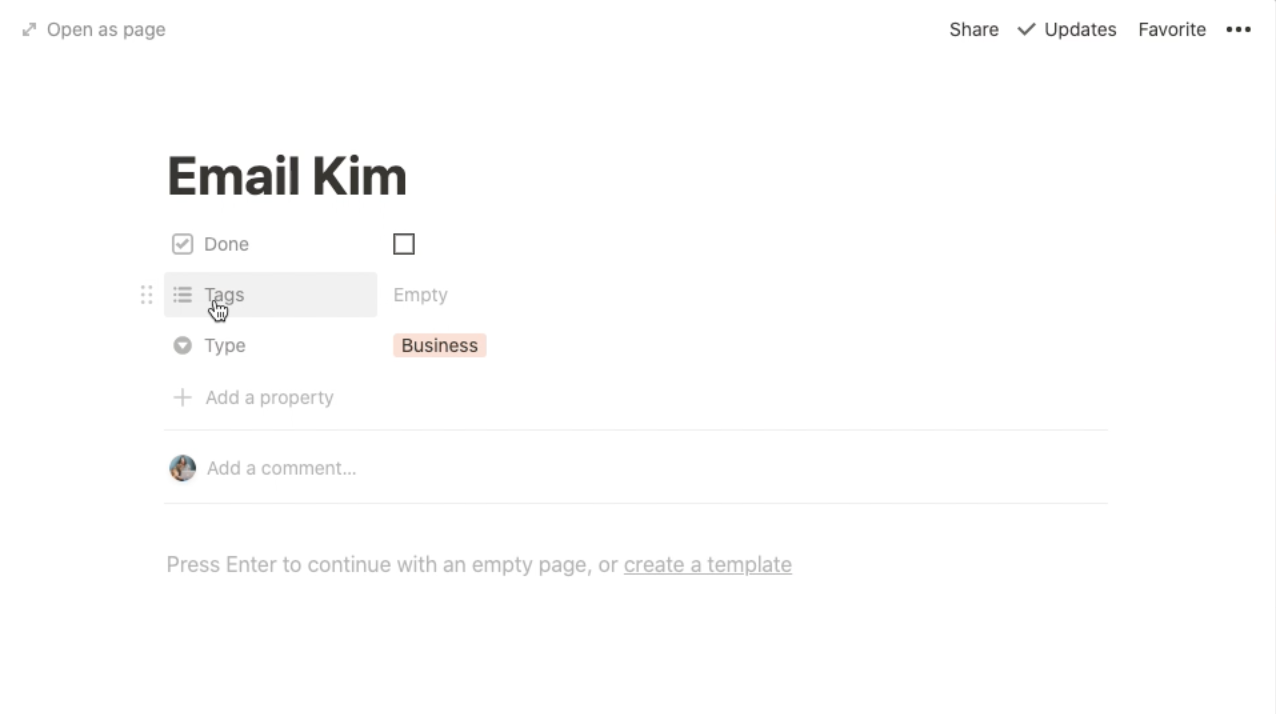
Now, you can see that each item in this to-do list is actually its own page inside of Notion that you can open separately.
You can type in your to-do list items, just like we did the first time around.
As I opened one of these items, I can see that I have the option to add properties.
The first thing I’m going to do is create a property for personal and business tasks. So, I can separate them out if I want to.
I’m going to create a new property, call it, type that I’m going to have it be a select property. And then for my options, I’m going to add personal and I’m going to add business. And then I’m going to select which one fits for each one of these tasks. So, email Kim is going to be a business task. This is personal, this is personal.
And this one is business. You can also add a ton of different properties. If you had a team, you could create a, person property and assign it to somebody on your team and create a date property if there’s a specific to do list item that has a deadline. You can add files and media. If you wanted to upload a photo.
You could create a checkbox property. So, I’m going to do a checkbox property here and call this one Done. And that way I can check off the item on my to-do list when it’s done. And I’m also able to rearrange these just by simply clicking and dragging them around. I’m going to remove this default tags property. Cause I just don’t need it right now. And maybe I’ll go ahead and add the deadline like we talked about. So, I’m going to have a date property, call this deadline, and then I could come in here and select a due date. And I can also create a reminder if I want to.
Okay. Now let’s add a deadline for some of these items.
Another thing I want to add is a priority. So, I’m going to create a new property and call it priority. And then I’m going to have this also be a select property and I’m going to have a high, medium and then a low. And I’m going to drag this up here. I want that to be the first one I see. And then I am going to sort these by priority. This to-do list could be done as is, but I want to show you a few ways to make it even more custom and to create different views based on the data that you want to look at.
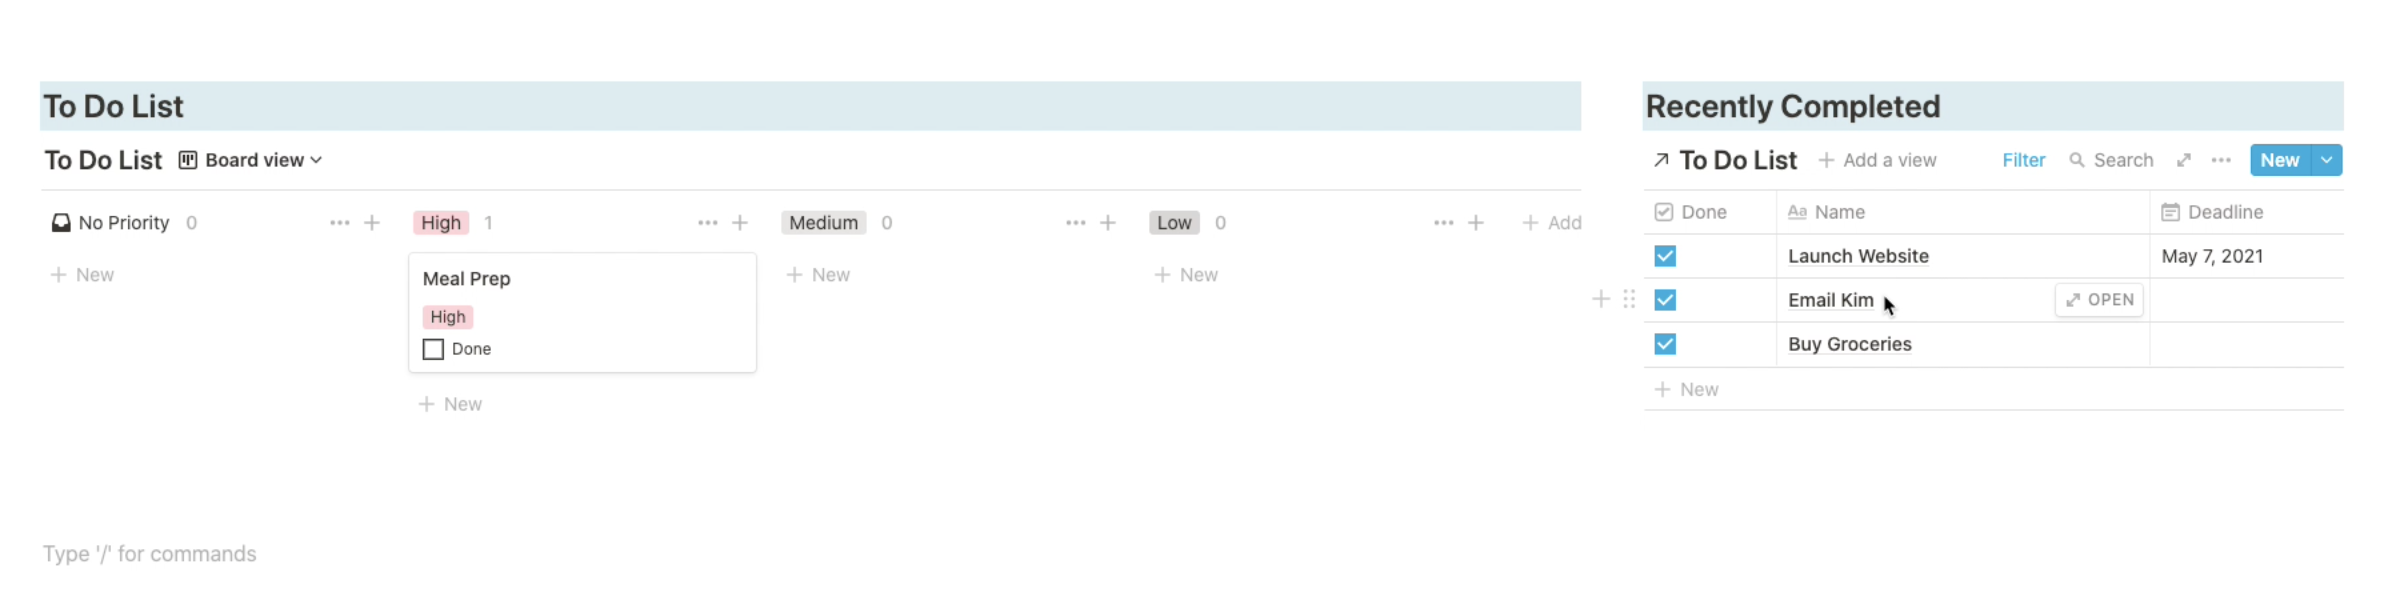
Come up here to the top and choose, add a view, and I’m going to create a Kanban board, sort of like a Trello board. Right now, it’s sorting by personal and business tasks. I actually want to change this to group by priority and that way I can now see my high priority, then medium and my low priority tasks all in one place. And then if I want to, I can drag these around as they become more or less important.
As your to do the list gets longer it’s going to be kind of frustrating. If all of the items that you’ve done are still hanging around on your to-do list. So, what I’m going to show you next is how to filter out all of your completed items. So, you no longer have to see them cluttering your view.
We’re going to click on filter over here on the right under those three dots. We’re going to add a filter. And I am going to say when done is unchecked and that way it’s only showing me items that I have, unchecked and it’s ignoring everything else,
But say, I want to still see some of those items that I’ve recently completed. I don’t want them to disappear altogether. In case I accidentally checked one off. This is where linked databases come in. I’m going to hit that forward slash button and type in linked database. And then I am going to pull in my to-do list.
As you can see, that’s basically just made a copy of the first database. The only difference is it’s back to the original view that we had set up. I can even turn this one back to the original default view as well, just by clicking this button over here.
What I want to do with this second to-do list here is show recently completed items. But first I have to know which items have been edited recently. So, I’m going to click into any one of these items and I’m going to add a new property and this property is going to be one of their advanced properties.
I’m going to say last edited time. And I’m going to call that here. Last edit. Come back to my to-do list. Now I’m going to come over here and filter and select where done is checked off and where last edited. That is let’s see here is with then that’s. What I want to do is within the past week. Now, what I’m going to do is create headers for both of these databases. So, I know which one is which. So, I’m going to go over here and hit H2 and call this to-do list. And I am going to color this in blue. Then, I’m going to create a, another one. And I actually want this to go all the way across for now.
I’m going to create another one H2 and call this recently completed. And we’re going to color this one blue as well. And then what am I doing? I’m going to drag this so that it falls right next to the other one. And I want recently completed to be a, to be a little bit smaller than my main to-do list.
This top one is my main to-do list. So, I’m going to drag this under that first header. And the second one is my recently completed to-do list. And then I have to go back for this and go back to that view we created where I filtered out. So now I can see these are my these are all my to-do list items that have yet to be completed.
These are my recently completed. I’ve got my little done check box here. I’ve got all the items that I need. I’m actually going, pull this done one over to the beginning and move this over. See how flexible this is? And then say I accidentally, I checked that by accident. All I do is uncheck these and they’re going to disappear from this one and pop back over to this database here.
And then if I check items off, they’re going to fall under the recently completed items on the right. But this is just a nice way to have a quick list to show you, know, what are those recently completed tasks in case you accidentally, checked one off or in case you want to click into any these tasks to learn more about them.
Because filtering in Notion is so, so powerful. I highly recommend you create one Notion database for all of your task items. And then you use filters and linked databases to show different versions of that based on what you want to look at.
If you’re interested in learning more about Notion and you want to see more videos like this one, let me know in the comments. I would love to hear from you. Also, don’t forget to subscribe, so you don’t miss any more videos from this channel.
Thanks so much for watching and I’ll see you in the next one.
Using Notion Checklists (Beginner)
This is by far the easiest way to create a to-do list in Notion. A checklist to-do list functions like a Google Doc, but there’s room to grow into more advanced setups as you learn about the platform.
To make a checklist to-do list…
- Open a new blank page and give it a title.
- In the body of the page, type the days of the week and arrange them however you like. I prefer my days side-by-side and color-coded. I also add headers for my “personal” and “business” tasks.
- Below each day of the week, type “/” and choose the “checklist” function.
- Type each of your tasks on a new line, and check them off as you complete them. Easy!
This setup is perfect for recurring tasks, like grocery shopping or sending weekly check-in emails. At the start of each week, you can uncheck all the tasks and start fresh.
Creating a Notion Database To Do List (Intermediate)
If you have lots of one-off tasks or bigger projects, I suggest branching out into databases. These allow you to more easily organize your tasks based on type, date, and level of importance.
To make a database to-do list...
- In the body of your new blank page, type “/” and select the “Table – In-Line” database.
- Within this table, type your to-do list items.
- Open an item and edit the properties. I like to add a date, status, and priority level property. I also include a checkbox to show whether or not the task is complete.
- Sort your database by due date, priority level, or type.
This setup allows for a little more customization than a checklist to-do list. You can sort by due date, filter out completed tasks, and even create more complex views like the one in the following section.

Filtering Linked Databases in Notion (Advanced)
Because Notion has so many options for filtering and sorting your tasks, I always suggest keeping all your to-do list items (business and personal) in a single database. If you want to see different subsets of your list or sort it in different ways, you can create multiple views for the same database.
To create multiple views with linked databases…
- Create your master to-do list database following the steps in the previous section.
- In another spot on your page, type “/” and select the “Create linked database” function.
- Change the view type. Here, I have a Board View and Table View. (Optional)
- Create filters. My Board View shows all my incomplete tasks (Filter: checkbox is not checked.). My Table View shows my recently completed tasks (Filter: checkbox is checked. Date: within the past week.)
- Arrange the two database views however you like, and you’re done!
This is the system I use for all of my Notion to-do lists. It keeps me super organized and helps me prioritize my business and personal tasks. Plus, it looks great!
Save time by grabbing our super simple Notion to-do list template.
Purchase my Notion to-do list templates (and if you want all my dashboard templates you can add them after checkout). Grab 50% with the code BLOG for a limited time by clicking here.
Organize Your Life and Business Using Notion
Whether you’re new to Notion or a long-time fan, there’s always something new to learn and try. I will continue to share how I create new Notion templates here on the blog so you can follow along.

Galen Mooney is the founder of Local Creative, a boutique web design studio crafting elevated websites for small business owners and creatives with a focus on connection, clarity, and growth. With over a decade of experience in design and SEO, she’s partnered with hundreds of creative brands to build custom Showit, Squarespace, and WordPress websites that build trust and momentum over time.

Hey, thanks for the helpful content. For newer users, the “arrange however you want” is a stumper in certain cases. For example, to even just put the two linked databases side by side I had to do this workaround: https://www.notion.vip/arrange-databases-into-columns/#:~:text=However%2C%20Notion%20prevents%20you%20from%20arranging%20them%20into,Turn%20into%20Inline.%20Your%20databases%20remain%20in%20columns.
Still not finding how to do the separate titles above the database names. Do you have any pointers on that ( to show “To Do List” on the left and “Recently Completed” on the right).
Nevermind, in the video transcription that I was using it did not mention it, but I see in the video it did. Any thoughts on how to not have the scrollbar show up automatically?
Glad you got it figured out! I have another tutorial coming out soon about how I am reorganizing my main dashboard pages (using some of Notion’s recently released features) and that will help to explain how to create the side by side look with custom headings.
Hi! I was wondering if you could help me solve a problem I have with Notion. I tend to come up with To Do’s as I’m in meetings or gathering research, but want to aggregate them later. So while I’m taking my meeting notes (or my research notes), I’ll come up with follow-up action items. I like to see the context for these items (the notes before the To Do) and I also don’t want to open up a separate note/database to log the To Do – I want to log it in the meeting note. I can’t figure out how to do this in Notion as I organically take notes – while I can use the “/To Do” to create a checkbox, I can’t automatically aggregate my To Do’s across all my notes.
In Workflowy, I could just tag a bullet in my notes with #todo, and then search by the hashtag and all my To Do’s across all my notes would pop up in one view. Is there an easy way to do this in Notion?
Yes! The cool thing about Notion is you can take notes using any blank page and keep track of everything with headings, bullet points, and checklists (like any blank page of notes). Then after the meeting, you can drag over important items into a tasks database so that you can keep them organized in your main task list. This makes taking notes on the fly easier and then you organize them into specific tasks afterwards and it only takes an extra minute or so. Hope that helps!
Thank you for these tips, these were quite helpful. I have one question – is there a good way to automatically strikethrough the text of the task description once a checkbox is checked?
Hi Gavin – You’re not able to do this with databases at the moment but this does work with the checklist/to do list option in Notion. Hope that helps!
Just the best breakdown and the video was all I needed to get even more than I hoped for. Thanks so much!
Thanks, very useful! I had not noticed the last edit property before.
Too bad the filter options in table columns are more limited. I have a list of features that have tasks linked to them. I’d like to filter the Tasks column so that is only shows the recently completed tasks but I’m not sure it can be done.
Thank you so much for this! Working out how Notion functions in incremental steps like this, has finally unlocked something in my brain and I can finally organise Notion the way I want 🙂
Thanks again
Hi, I am looking if there is a way that I can have different projects A, B, C (all containing tasks lists).
I also have separate tasks lists (without any project like House Chores etc.)
How can I generate a View reflecting only the Tasks which are overdue, due today or have high priority.
Is there any way where you can get a summary of all non-completed ToDo items across all pages order by reminder date if there is one?