
Have you ever wanted to turn yourself into an animated GIF? Adding GIFs to your website or social media can add so much movement (and a lot of personality)! In this post, I’ll show you how to create a GIF from a series of photos or a short videos.
Transcription: How to Turn Yourself into an Animated GIF in Canva
Have you ever wanted to turn yourself into an animated GIF? Hi, I’m Galen. I’m a web designer and I love adding GIFs to my client’s websites, just to give them a little bit of movement and a more engaging feel.
I’m gonna show you how to do this in two different ways today, both using Canva, but first, here are some great examples.
Examples of GIFs Used in Website Design
This is a super fun one, showing off one of my client’s amazing dance moves. It just adds so much personality, and this is an example of a brand photographer that I’ve worked with. I just love the energy when the photo comes to life.
Here’s one on my own website on a thank you page. I just love, again, how it brings that little element of excitement after somebody has signed up for your email list.
Most people will know that they want to create a GIF before they take a photo or video, so they’ll capture the image or the video with that in mind. But if you’re somebody who’s recently worked with a brand photographer, A lot of times they’ll take five or six shots in a row trying to get that perfect expression from you, and you can take all of those shots and string them together to make a really fun animated GIF for your website.
So, if you’ve recently worked with a brand photographer and you’re going through that gallery, look at the outtakes and see if maybe there’s an opportunity to string those photos together into a sequence to create a really fun and expressive GIF.
Create a GIF of Yourself
I am going to show you how to create a GIF from a video as well as a GIF from a series of images. First, let’s start with the images, and then I’ll show you the video. Second,
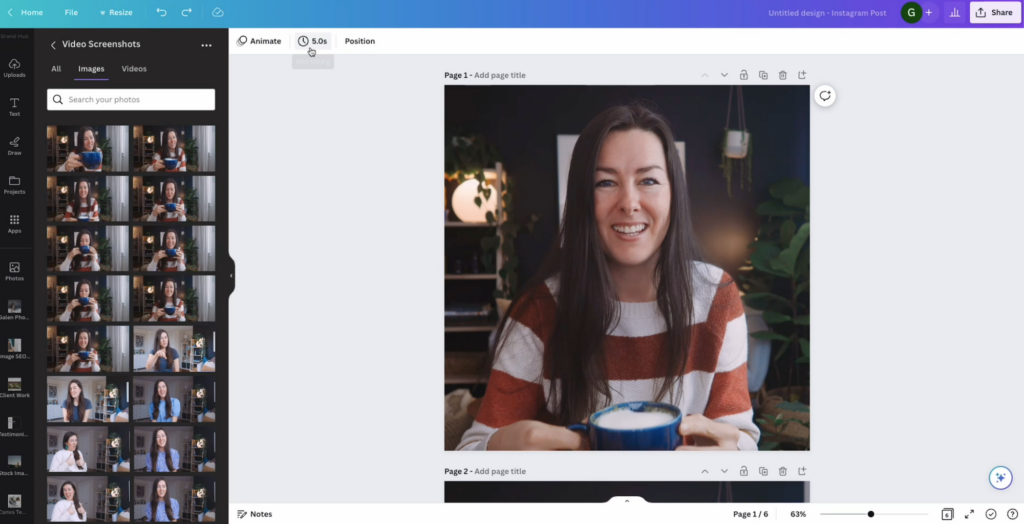
I took a series of photos of myself drinking this delicious matcha latte, and now we’re gonna turn them into a GIF. So, let’s see here. I want to make sure I put these in order. So, I’m just gonna start by picking one of the images and having it fill the screen, so it fills the screen like this. That looks good.
Let’s do, we’ll copy this. We’ll drag in the next one. Let’s do, actually, I think we started here, and I want to make sure I keep myself centered in there and I can rearrange the order after. I’m just gonna put these all in so you can see. Okay. And each photo that I took is just a little bit further along in the process.
So, I’m bringing the coffee or the matcha up. Oops. That’s the same one. There’s a great photo of me and I’m trying again to keep myself in the same position. And I’ll show you how to check this in just a second. There’s after line it up and then. I think this is the last one. I don’t even know if we need that one.
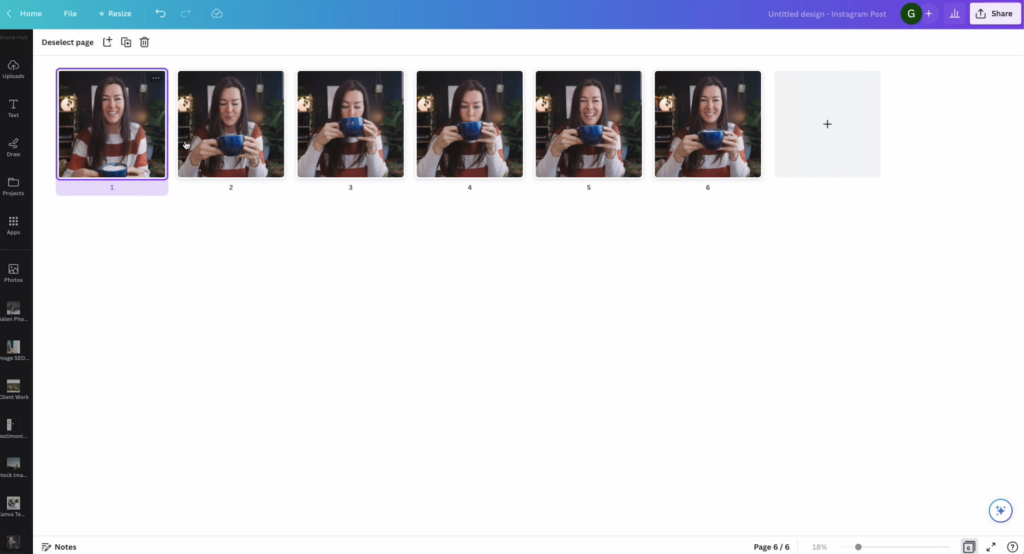
I’m gonna come down here and click this grid view so I can see all of the images and I just want to make sure that I’m kind of centered in between all of them. I actually think I’m going to get rid of this one.
And, and there we go. And I think this, I can rearrange the order here too. This looks good.
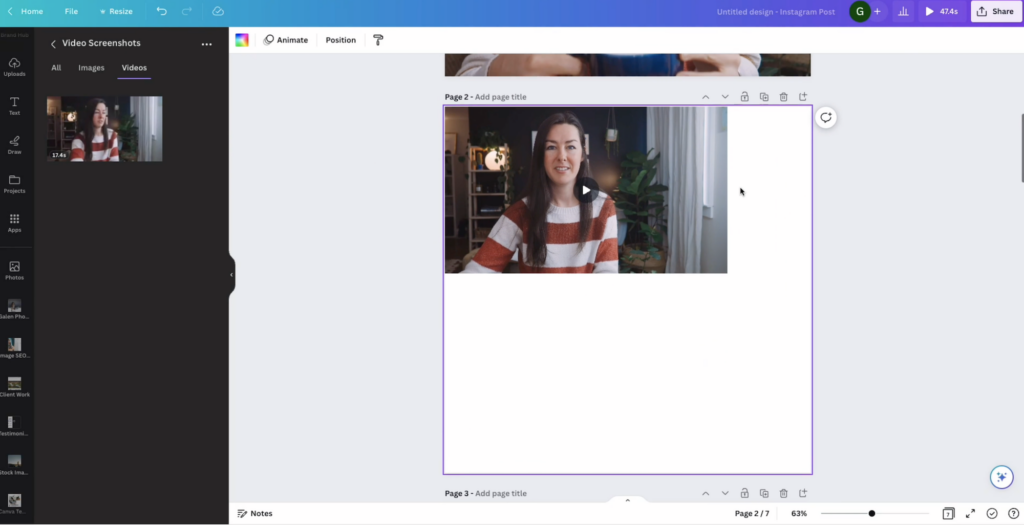
Now that we have all of the images added, we’re gonna come up here and adjust the timing of each of the. Slides or the pages inside of this Canva document, and because I started this as actually an Instagram post, you can see up here, I just used a regular Instagram post template. You might not see the clock as the default, and if you don’t see this one quick way to get it to show up is just to add a new slide here.
Come over to any videos that you’ve added or even just upload a video directly from Canva. And then once I add a slide with, or a page with a video on it, it’s now gonna give me the timing options for each and every slide within this document. So, we’re just gonna add it and that’s gonna make it so then we have this animation timing for each of the slides.
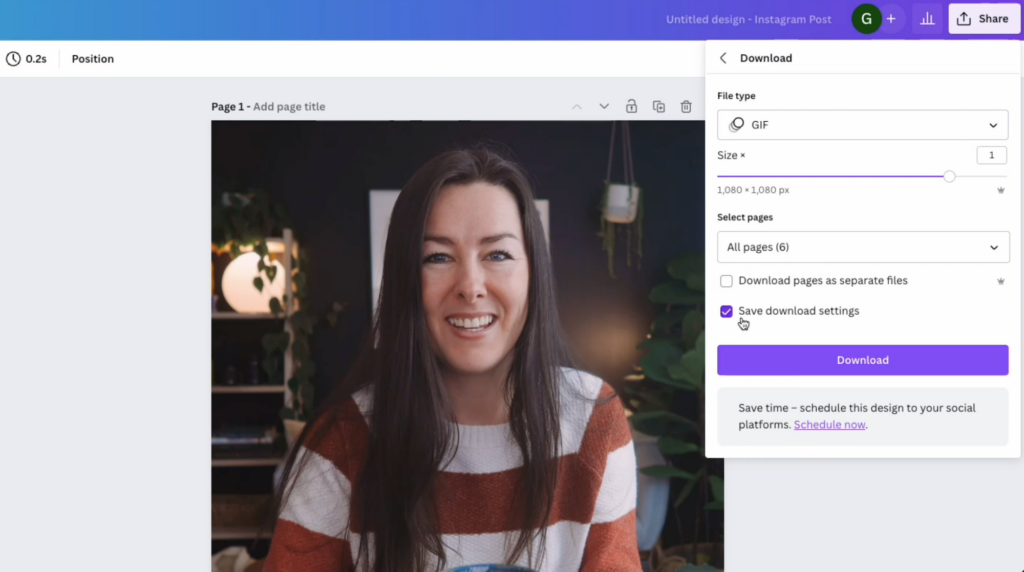
We are going to now get rid of this video because we don’t need it. For this example, we’re going to adjust this down to 0.2 seconds. We can play around with this and always change it. If it doesn’t look good, apply that to all pages. There we go. And now we can hit download, share, download. All pages and we want to change this to a GIF and then we’ll click save download setting.
Cause we might export this a few different times. Hit download and we are going to let this export. While that’s loading, I’m gonna take a quick sip of my matcha.
So good. And here we have it downloaded. If you double click to open it, it’s going to open inside of the Mac preview app, and this will not show you your GIF with any sort of animation. The best way to preview it on a Mac is just to click on the file, hit the. Space bar and you’re gonna see it pops up just like that.
Create a GIF with a Transparent Background
That looks great. Next, we’re gonna try to do the same thing, but let’s get rid of the background. And you can actually see here, I probably could have aligned this a little bit better so that my eyes are exactly the same, or the background is exactly the same in each and every clip. So maybe we’ll do that for next time, but for now, Let’s come back to Canva.
We’ll close down this little download section, and in each of these images, we’re gonna come in here to edit image and the background remover. And we’re actually gonna remove the entire background out of each and every image.
So, this will take a little bit of time. Again, we’re gonna go through each and every image, remove the background.
You can see Canva does an amazing job with this. It is so, so accurate. I’m always astonished at how well it’s able to pull me out of a background, especially when it’s a really busy background with plants and things going on. So, edit, image, background remover. We’re almost done. And while Canva actually does let you remove the backgrounds from videos now, which is insane, I just haven’t found that the background remover for videos is quite as good as it is for photos. So that’s why I like to do this with individual photos versus a video clip. But I am gonna show you how to do it with a video clip just for fun in just a minute.
There we go. Everything looks pretty aligned. Now that I have the background removed. Same thing. We are going to check it in the grid view just to make sure everything looks pretty well aligned, and then I am going to export . All the settings have been saved, and we’ll just make this a little bit smaller.
Re-Sizing Your GIF For Website
I do recommend that you make your GIF as small as possible, depending on where you’re going to use it, because these file sizes can get really large, really fast, and that can slow down your website. So don’t overdo it with GIFs on your website and make sure that you make. The GIF as small as possible without it getting blurry.
You’ll be able to test it a little bit, export a few different sizes, and see what size is going to work best depending on where you’re going to use it on your website. Okay, now we have the second version of our GIF. I’m gonna hit the space bar to pull up that preview and you can see it looks great with a white background. Here’s the one with the full image background, and here’s the one with the white background.
Adding a Color Background to Your GIF
Now if you want to use this on your website and have the GIF just blend seamlessly into the background, you want to try to match the background of the image in Canva with the background of the section of your website.
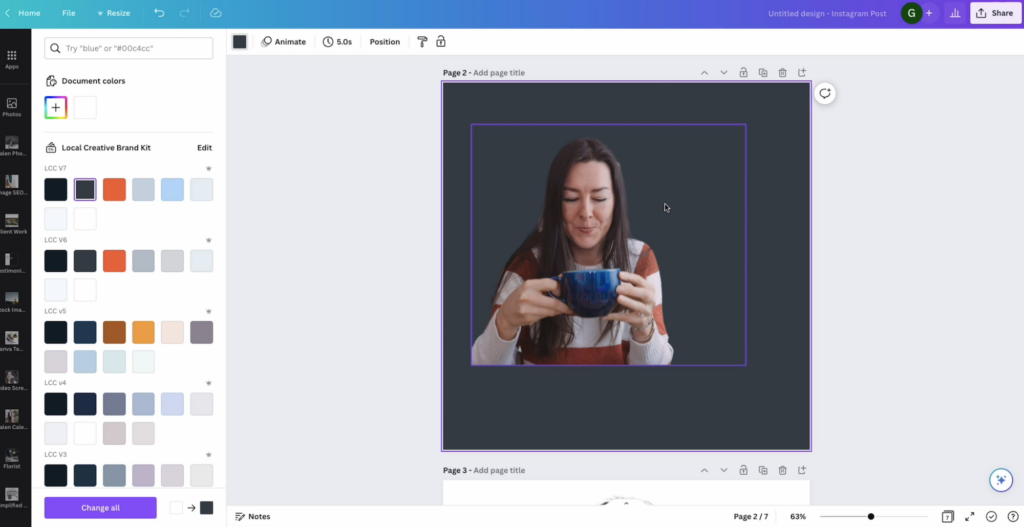
Right now, this image itself is the background of this page, but if I come to create a new page in here, we’ll come back to the images that I had. Say we pull in one of these images. I’m able to edit background remover. It’s so fast. Come up here. I could change the background color and then I can have this sort of fill the space.
In a way that makes sense. And now I have this GIF on a dark background. I have to do this for every single image that I want to include in the GIF. Another thing to keep in mind is that when you export a GIF, it’s going to have limited colors. So, you might notice that the background color that you’re seeing in Canva is slightly different from the GIF that you’ve exported.
So, in that case, you just want to take a little color picker and you want to sample the color. From the background of your exported GIF and make sure it matches what you’re using as a section background on your website.
Removing the Background of Your GIF
If that doesn’t work for you and you want to totally remove the background again to use on your website or to even use on social media as a sticker on your Instagram stories, You can head over to unscreen.com. You can upload your clip. And this is now, as you see, it’s added a really nice, transparent background to this GIF. I can download it.
And now here’s the one with the white background and here’s the one with the transparent background. So, I could use this over anything, and it’s going to show up with no background, which looks really cool.
Using GIF Stickers in Your Instagram Stories
And now just for fun, I made this really cute Instagram story and added myself as a sticker and I can actually just drag myself around the screen and uh, place myself anywhere. And I think it came out really cute.
Really quickly, I’m gonna show you one more way to make a GIF, and that is from a video.
How to Turn a Video of Yourself Into a GIF
I took a super short video of myself drinking coffee and uploaded it here. You could also do this with a screen share or anything, any video that you have. I’m gonna stretch it out so that it fits this entire space. That’s a great little, uh, picture of me there. We are going to edit this. I want to trim off the very beginning all the way.
I think I want to have it trimmed right where the coffee takes up the full screen and then end right when the coffee takes up the full screen. As soon as it hits there. There we go. We don’t want to make our GIFs too long because that can also make the file size too large, which can again slow down your website.
This is a little off center here, so I’m gonna center it a little more. Hit play again, I think I can even trim off just a little bit more in the beginning. We don’t want to have too much time with the cup in the screen, so like right there, I’m double clicking to bring up the grid so I can crop it.
There we go. Let’s try again. Got some nice milk foam on my face. That looks pretty good. I want to make sure I know what page I’m on. We’re on page two because I don’t want to export the rest of the images. We’re just doing this video as a GIF.
We’re going to hit share up here, come to download, make sure that we have only selected the current page. That’s page two, and then export this as a GIF.
I am getting down to the end of my macho here just in time to wrap up this video the final reveal. Of course.
And here it is the final reveal. This is the video that I turned into an animated GIF. You can see it’s a lot smoother than the photo GIFs because it’s not missing as many frames, but it looks really good, and I love that it loops where the coffee goes.
Up to the screen but you can get really creative and have a ton of fun with these. Let me know in the comments how you plan to try this out on your own website. Make sure to subscribe if you like this video, and I’ll see you in the next one.
Step 1: Choose Your Images or Video
Most people will know that they want to create a GIF before they take a photo or video, so they’ll capture a series of images or a short video with that in mind. But, if you’re a business owner who’s recently worked with a brand photographer, a lot of times they’ll take five or six shots in a row trying to get that perfect expression from you, and you can take all of those shots and string them together to make a really fun animated GIF for your website without having to do any extra prep work.
Step 2: Upload Photos or Video to Canva
Once you have your images or video ready, it’s time to upload them to Canva. If you’re working with a series of photos, you’ll want to upload each of them to your Canva account.
If you’re using photos to create your GIF…
Step 3: Add your photos
If you’re using photos to create a GIF, arrange your photos in the order that you want them to appear in your GIF each on different pages of your document.
Next, you’ll want to adjust the timing for each photo. Click on the clock icon and if you don’t see the clock icon, you can add any video element temporarily to your Canva document and it will appear at the top of your screen.
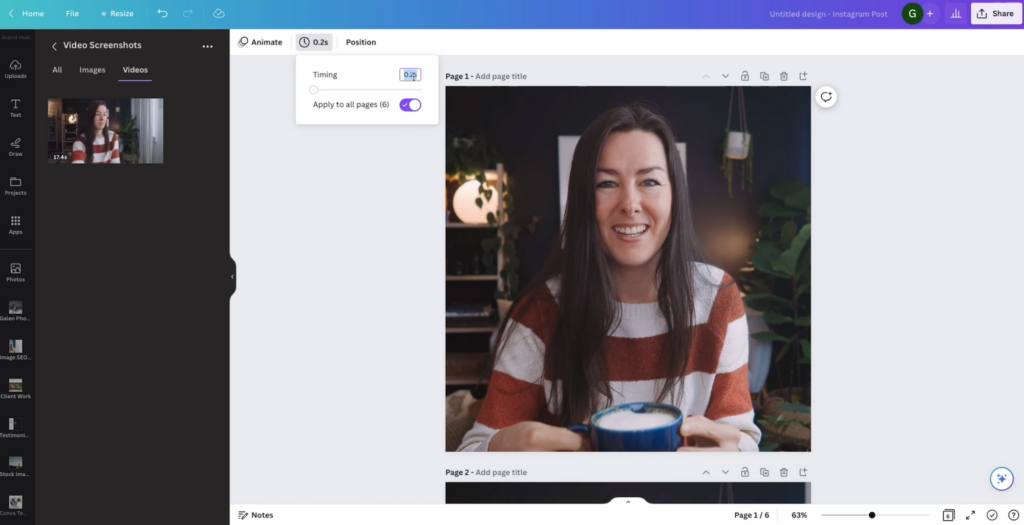
You can adjust the timing for each photo individually or apply the same timing to all photos. We recommend using a shorter timing (between 0.2 to 1 second) for a smoother animation.
Step 4: Download GIF
Once you’re happy with your GIF, it’s time to download it. Click on the “Share” button and then “Download” in the top menu, then select “All pages” and choose “GIF” as your file type. We recommend making your GIF as small as possible to avoid slowing down your website.
If you’re using a video to create your GIF…
Step 3: Add your video
Add your video file to your Canva account and drag it onto a blank page. Align it exactly how you want your GIF to appear and trim the ends of your clip as needed.
Step 4: Export your GIF
Go to “Share” and then download and change the file type to “GIF.”
Step 5: Add GIF to Your Website or Social Media
Now that you have your GIF, it’s time to add it to your website or social media. If you want your GIF to blend seamlessly into the background, try to match the background of the image in Canva with the background of the section of your website. You can also use your GIF on social media as a sticker on your Instagram stories.
Note: The background remover feature is only available in Canva Pro; try Canva Pro free today.
Create a GIF with a Transparent Background
If you want to remove the background from your GIF, you can use a tool like Unscreen.com. Upload your clip, and the tool will add a transparent background to your GIF. You can then use it over anything, and it will show up with no background.

You are now a GIF!
That’s it! With these simple steps, you can turn yourself into an animated GIF using Canva. Add your GIF to Instagram stories as a sticker (see video above for an easy way to do that) and tag me over on Instagram @localcreative.co so I can check it out.
Canva is definitely one of my favorite tools. Check out this other blog post if you need some help on creating a website mockup inside Canva.
I use Canva for tons of things in my business, but there’s one thing I won’t use it for: hosting my ‘link in bio’ page. Take a look at this blog post on why you shouldn’t use Canva for your ‘link in bio’.

Galen Mooney is the founder of Local Creative, a boutique web design studio crafting elevated websites for small business owners and creatives with a focus on connection, clarity, and growth. With over a decade of experience in design and SEO, she’s partnered with hundreds of creative brands to build custom Showit, Squarespace, and WordPress websites that build trust and momentum over time.
