
Creating a scrolling website mockup for your web design portfolio is a quick and easy way to spice up your social media and catch your ideal client’s eye.
Struggling to find your next website design client?
Download our free guide here with over 29 tried and true strategies you can use to attract your next dreamy client today.
Here’s how to design your own mockups in just three steps.
VIDEO TRANSCRIPTION: Creating Web Design Mockups
This is why I can’t wear blue light glasses while filming YouTube videos. Cause it looks ridiculous. All right. Anyhow.
Hey, I’m Galen from local creative co. And in today’s video, we’re going to be talking about a few different ways to create website mock-ups including a scrolling website mock-up video. That can be really cool to use on social media or in your web design portfolio.
When you’re a designer, it’s really important that you show up online in the best possible way. You want to be putting your best foot forward. That means when you’re showing up on Instagram, you want your work to be presented in different and unique ways. And the same thing with your web design portfolio.
We don’t just want to take a screenshot of your work and throw it up there. We want it to be interactive. We want it to be engaging to our dream clients so that they end up filling out our contact form and hiring us.
Now you could definitely use Photoshop to create all of these mock-ups, but I’m going to show you how to do it inside of my favorite design app, Canva not only is Canva free and super easy to use, but it has so many great features on their paid plan as well. If you want to check out a free trial of Canva pro, I’ve got a link in the description of this video to get you started.
Now, let’s dive into actually how to put this all together.
The first thing you’re going to do inside of Canva is create a new graphic. Now I just use the Instagram template to get started here. It is 10 80 by 10 80 pixels. And this gives us just a really easy square to work with. Here are the two different designs that I’m going to be showing you how to create today.
And the really cool thing is this top one is actually a video and we can export this as a video or a GIF. Out of Canva and be able to use that on our website or social media accounts. So first, how do you actually get a screenshot of your website to show up like this? Let’s do this bottom one first.
How do we actually get a screenshot like this of a particular website? What you do is you go to the website that you want to take a screenshot of. We want to get a full page screenshot of this website, right?
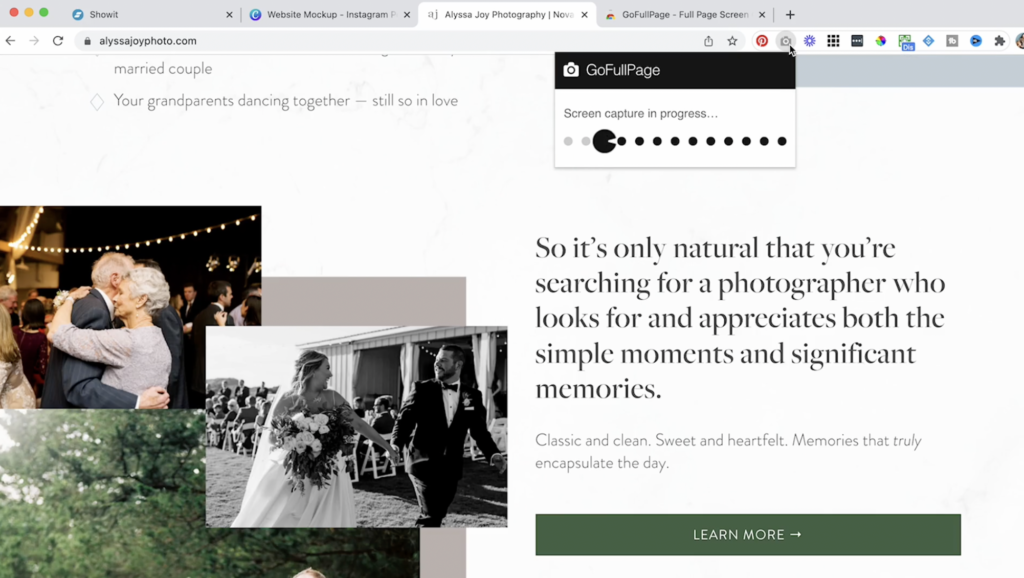
I’m going to scroll down through the whole website just to make sure that all the individual elements of this website are loading properly because sometimes. When I take a screenshot or sometimes when I first load a page, it has lazy loading enabled and certain elements don’t pop up right away. So we want to scroll through the whole website before we get started. Then I have this little Chrome extension up here. It is called go full page. All one word. It is the full page screen capture. Google Chrome plugin. So you have to actually be using Google Chrome for this to work, but it is a free Chrome extension and it is absolutely wonderful for taking full page screenshots of any website on the internet. So I’m going to download this and I’ve already got it downloaded. So if you wanted to add it to your account, you could just look up.
Uh, go full page, screen capture. We’re going to type in, go full page, screen capture. Here. It is the first thing that shows up in Google. I will put a link to this in the description below. You can click on that go full page, screen capture, and it’s going to give you the option to add to your Google Chrome account.
Once it’s added you go to the website again, you scroll through to make sure everything’s loading properly, and you’re going to hit this little camera icon and let it do its magic. It is going to scroll through the entire page of your site and record everything as it goes, as you can see, I have some sort of parallax elements happening here. Meaning those sections are kind of moving as you scroll down the site. Those can cause issues. Sometimes you may need to either take a few different screenshots of your website to make sure it looks good, or even you may want to turn off parallax scrolling before you do a full page screen capture. So I’m going to zoom in here and just check to make sure it looks pretty good.
Once my screenshot is ready to go. I am going to download it by clicking this little arrow here, download image. I want to download this image as a PNG, not as a PDF, because if I download it as a PDF, it’s going to split it into different pages and we want it to be one long image. So once I’ve got that downloaded, it is going to save to the downloads folder on my computer.
I’m going to open up Canva. I have a special folder inside of Canva. Again, I’m a Canva pro user, but you can do this on the free account and I’m going to drag this image from my downloads folder to Canva, and I’m getting an error. This image is too big. That’s okay. I am going to open this image on my Mac. So I’m going to double click it and open it inside of preview. this is going to be different if you’re using a PC, but whatever image program that you want to use to resize, this image works well. I’m going to go to tools, adjust size. And I might change the width of this image to be 1500 pixels. Let’s see if that shrinks it down a little bit. That did looks like that. Shrink did shrunk at town quite a bit here. And then I might want to even screenshot or even crop some of this too. So I’m going to find a part of the page that I want to feature.
And I am going to hit command K to crop that image. I just selected the S the part that I wanted to keep. And hit command K to crop that image. Uh, I’m going to hit save here. And now I’m going to try to re upload that image. And as you can see this time, it is uploading just fine. Once Canva has loaded this image, I can click it to bring it on to the page. And similar to the style I have here, where the web design is actually kind of blurry in the background. I’m going to take this image and expand it to fit the entire background of the space here. All right, that looks pretty good. Now I’m going to click on the image again, click edit image, and I am going to look at the adjustments here. So I’m going to click see all under adjustments, and I’m going to give this a little bit of a blur factor here. That’s starting to look really good. But I want to, I still don’t want this to be too distracting. So I’m actually going to add. Just a basic square over top of this.
And then I’m going to take the transparency feature up here. And bring it down just a little bit and we can keep it that dark blue color. I can change this overlay to be any color that I want to within my brand palette. Now I am going to open up this image again. So I’m going to go back to that folder that I put the image in. I’m going to open it again. I’m going to make this image a little bigger.
That looks good. I’m kind of liking how that comes together. I do like the look of this, and I think this is getting pretty close to what I want it to look like, but I’m going to take this even a step further. I actually want to add a little background shadow to this image. So it looks like it’s kind of popping from the background.
So I’m going to edit this image again. I am going to come down here to shadows. I’m going to add a drop shadow.
And I can click again on this drop shadow settings and I can decide how transparent I want it, how blurry I want that background to be. I think I want it to be pretty blurry. I want it to come off a little bit more, really have a kind of pop off the page there. I want it to be a little more transparent.
Let’s give it a little more angle. Um, no, not too much angle. Let’s see here that looks funky. Let’s go back to zero. Let’s offset a little more.
You can see, I’m just sort of playing around. Let’s make it a little more transparent. Now it’s starting to look like this mock-up that I did is popping off the page. And again, you can decide, do you want it to be at harsh line? Do you want it to be a little more blurred here? I think I’d want it to be fairly subtle. And maybe not so far off. So I’m just being picky here and just kind of playing with what I want it to actually look like. There we go. I think that looks pretty good. And I can still move this around on the page and then maybe I want to add some text. Or even maybe make the background color a little darker. All right. I kinda like how this is coming together.
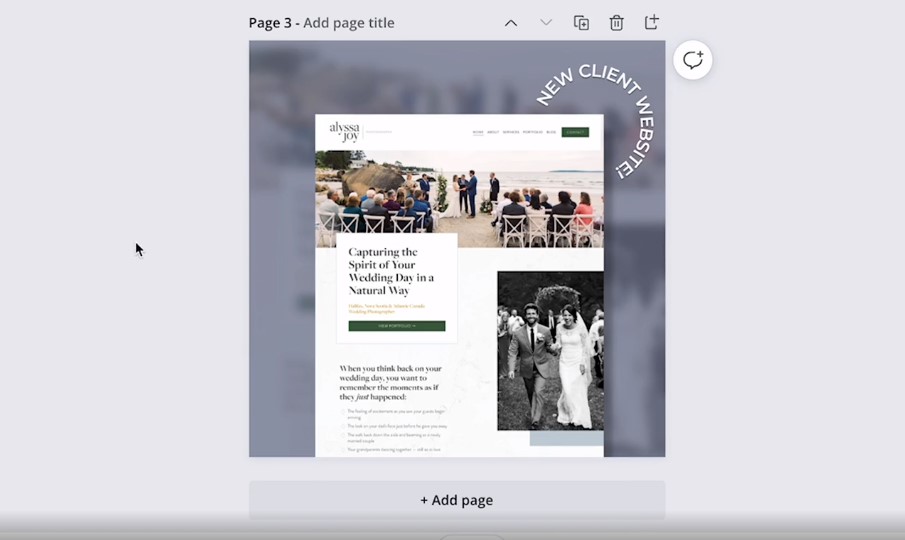
Now I want to add this cool little curved text element. Maybe this is a social media post that’s going on my profile. To talk about the launch of this particular website, a client website. So I’m going to click on the text item here. I am going to change the color to white. I’m going to come over here to my text settings and have it be all uppercase. Let’s see how this is looking. I think it needs to be a bolder, so let’s look for. A bolder font here so that it sticks out a little more. All right. We’re getting closer here. And then I want to get that little curved, uh, that curved style. So I’m going to go into effects and down here to curve. And there, you can see it’s already started to curve the line here. So new. Client. Website.
Go like this, then I click out. We’re getting that nice little curve. I might even want to rotate it a little bit. I can rotate it if I want to, and let’s make this circle a little tighter. So let’s come down here to the curve and I can decide how curved I want it to be. Rotate that a little bit. So I’m over here in the shape settings, and I can decide if I want it to be more curved, less curved. I kind of want it to curve right around the corner of the website here. New client website. That looks pretty good. I’m pretty happy with how that looks. I may even want to add a little bit of a drop shadow here. So again, I went to effects. I went to shadow and right now it’s a white shadow. Let’s make it a dark shadow here. And that way it is going to pop a little bit more on the page. So there we go. That looks really good. If I wanted it to pop even more, I could play around with going to a darker. A darker background. So there’s one example of how I can make a really cool website mock-up uh, and add any client website I want. So I’ve got quite a few screenshots in here. I saved them all in this folder here. Any screenshot that I want, that I like of, uh, client projects that I’ve worked on, I can scroll through.
I can grab one. Let’s find another example. And I would just basically drag that image on here. And it’s going to update for any screenshot that I have.
Now, let’s talk about how to create a video, um, how to create a video like this one here, where this is actually going to play. When I export this, it is not going to have a play button. Let me actually show you what that looks like.
So let me export the first page here. MP4, I’m going to do it as a video and hit that download button. This is going to take a minute because it is a larger video file. I’m going to download this and show you what it looks like, but basically on Instagram. Uh, it is going to play, as people are scrolling through your feed, which is really cool. So one option is to export this as an MP4 video, and that means you could post it to Instagram. You could upload it to YouTube or wherever else. The other option is to actually export this as a GIF, and that means it’s going to play automatically and it’s going to play on repeat, which is really cool. And the tool I use to actually capture this video is loom. So I use loom, but you can use any screen recording tool out there. Uh, I really love ScreenFlow or Camtasia is one that I think is specifically for PC. But you’re going to want to use a screen recording tool. You are going to go to the website that you want to record. You are going to click on the recording tool and I’m actually using loom to record this video. So I can’t click it right now, but you can do free up to five minute recordings. I believe on loom with their free account.
Um, I pay for loom, but their free account is absolutely wonderful for making quick videos. You can click. On, um, the loom tool I have again, already installed this as a screen capture software, but if I go to loom, if I go to Google and type in loom, Um, Chrome extension.
I can download from the Google Chrome store. You can see it’s going to say already audit. You can download this right. Or add it to Chrome, right from here. Add it to your account. And then go back to the website that you want to record, go into loom and record just the screen of this website. And then when it’s recording, you’re going to slowly scroll down to the bottom of the website.
And then you are going to scroll back up to the top if you want to. And the reason you want to scroll down and back up is because it’s going to go on repeat, it’s going to scroll down, back up, then it will repeat down and back up. So if you just scroll from top to bottom, then it’ll kind of like jerk back to the top and then scroll back down to the bottom again, where it’s nice to have it sort of flow down and then flow back up again. So that’s what I would do. I’m going to record this file, then I’m going to go back into Canva. And this again is the finished product. It looks like it’s finally downloaded here. If I hit play. You’re going to see, this is my loom recording of me scrolling through this website. It shows some of the fun functionality that I’ve added here with some of those split sections. I scroll to the bottom. And then I scroll back up to the top really quick at the bottom. Um, so that way, when it starts over again as a GIF, then it will go from top to bottom again.
So here it is in side of Canva. And how I’ve set this up is once I have that screen recording, I will just drag and drop it into Canva. And it will upload that video, just like a photo upload that video directly into my Canva account. And then what this image is, and I’m going to actually. Actually duplicate this, what this image is, is it’s actually just a random laptop. So I’m going to delete this and delete this whole section here. I am going to design how I want this page to look. So let’s maybe do like a split screen scenario here. We’ll get rid of that. I just added one square with a background to the top or one rectangle. Let’s do another one down here. Maybe have this one. Be. Like a pink color. That looks kind of cool. Then I am going to go to photos. Um, and I can search. Laptop.
Let’s see here, actually, let’s look at, let’s look for an element first. Let’s look for a laptop element.
Okay, here we go. So we can see that Canva already has some that we can use by default. Some are going to be free and some are going to be pro let’s actually search. If we can find a Mac book.
There we go. This one looks a little better. Here is a Mac book.
Looks pretty good. I am then going to copy this video. And this will be one that you’ve uploaded to your account. Right? You would just go into the folder where you’ve added it and add it to your image. I’m going to paste this in here and then I’m going to be really careful that I set it so that it’s exactly the right size and you can adjust it. So that it fits within that screen. I’m going to zoom in a little bit here. And just check to make sure it is fully going to all the edges. You can see there’s a gap at the top. There.
That is looking pretty good. Okay. So now for this one, I want this to be a GIF. So I’m going to zoom out so you can just sort of see the finished product here. That looks pretty great. Maybe I want to just make sure this is centered. And let’s download page two.
As a GIF. Short clip. No sound page two. Download. We’ll see what that looks like. That’s going to take a minute. And then one other option is instead of using a, um, using one of their laptop elements, we can actually find cool stock photos that we want to put our website designs into. So I’m going to go over two photos here. It says laptop. The one thing you want to make sure of here is you do want to make sure that whatever laptop you choose is facing straight on. You don’t want that laptop to be the screen, to be at an angle or anything else like that. You really want to make sure that the laptop is straight on. And that way it’ll be really easy to fit your video into the screen size.
If you’re using something like Photoshop for my, uh, for your mock-ups, you could get a little bit more creative with how you fit those images in. But let’s do it here. I’m going to copy. Paced. Zoom in so I can see those edges.
And just adjust this to the exact size you can see it’s not a perfect fit, but it’s pretty close. Maybe I even need to rotate it a little bit.
You can see, we’re still getting a little bit of that coming out of the bottom here, which is why it’s not an exact fit. So what I’m going to do to kind of fix that. In this particular case. Is I’m going to just add a basic square.
And let’s just kind of add that right here. I’m going to make it. Super dark.
I am going to.
Send this backwards. There we go. And I’m just going to have that fill up the space there. See how I just sort of filled in the gap. So it’s still not a perfect fit. But now you’re at least not seeing the white behind there. So, again, this is sort of an example that works kind of, but you just have to be a little careful with how the screen shows. I would say all in all though. No, one’s really going to notice that as not looking great. Right. But we can find other ones too. There’s a ton of great stock photos inside of Canva. Lots of them are free. And then there are lots of pro images. As you can see, anything with this little crown here is a pro, um, is a pro image, which means it’s free to use with Canva pro.
So here’s another example.
Shrink that down a little bit.
I like that. I still don’t think it’s a great image. Let me see if there’s a couple other ones I could choose.
Hm.
That’s a pretty good one. Well, that one’s kind of fun. Maybe this will be a good fit. Let’s try this pink image here. So I’m just going to cover up the other one that we had. And for this one I am going to do.
Um, whoops. Delete that. I am going to do a screenshot rather than a video. So I’m going to go into this folder that I’ve created. I’m going to pick one of my website templates that I’ve created here. I’m going to drag the website templates so that it just covers the edge.
And we’re going to adjust it. So it’s the perfect size here. And then once it’s in there, I can double click and adjust it so that it’s showing the part of the website that I want people to see. So maybe I want to show this section. I can click out. That looks pretty good. This would be a great template or a great mock-up to show on social media to illustrate your work. Uh, and I really loved how this came out.
So once you’ve got your video or your GIF exported. If it’s going to go on your website and you want it to play automatically, I recommend having it be a GIF and you want to make sure it’s not too, too long. I would say, try to keep it to maybe five at most 10 seconds long. Uh, because otherwise it is going to be a huge file. So try to keep your GIF’S really short, try to scroll somewhat quickly through your website if you can. So that way you’re not adding these huge files that could slow down your website.
I’m going to hop over to my website really quick to show you what this actually looks like in practice. Okay. So here it is on my website. You can see, I have got a laptop here and then it’s scrolling through the website on the right from top to bottom. It just adds this really fun animated effect to your website to show off your work and to keep your website visitors engaged.
Thanks so much for watching. I hope you found this video super helpful. And if you did let me know in the comments below. If you’re a designer, we have a free training just for you. And I’ll put the link in the description. So you don’t miss it. Can’t wait to see you there.
Please note, we highly recommend you get written permission from your clients before sharing any of your/their work publicly.
Using Website Mockups in Your Web Design Portfolio
As a web designer, you want to put your best foot forward when sharing your work on social media or on your website. While a standard screenshot can get the job done, mockups allow your potential clients to see your designs in action. Plus, a branded mockup design is a bit more dynamic and eye-catching than a screenshot alone.
Once you create your mockup template, you can easily edit it to showcase different projects and services. Share them on social media, add them to your website, or even send them in emails to prospective clients. Here’s how to get started!
How to Create a Scrolling Website Mockup for Free in Canva
STEP 1: Take a screen capture.
First, you’ll need to take a screen capture of the webpage you want to showcase. There are two ways to do this: as a still image and as a video.
To capture a still image…
Download the GoFullPage Chrome Extension. Then, go to the page you want to screen capture and scroll through it to make sure everything is loading properly. Click the GoFullPage icon in your extension bar, and let it do its thing!
When the screen capture is complete, simply download it as a PNG and upload it to Canva. If the file is too large, you may need to resize it on your computer’s image processor.
To capture a video…
For this, you’ll need a screen recording program. I personally prefer Loom because it’s easy to use and lets you take videos up to five minutes long even on the free version.
Go to the page you want to screen capture and scroll through it to make sure everything is loading properly.
Scroll to the very top of the page, and start your screen recording. While it’s recording, scroll slowly all the way to the bottom of the page and then back up. Stop the recording.
By scrolling down and back up in your recording, you can create a seamless loop of video in your mockup. When you’re done, download your video and upload it to Canva.
STEP 2: Design your mockup in Canva.
Next, create your mockup design. There are plenty of mockup stock images in Canva Free and Canva Pro, and you can use the design features to customize the look for your brand.
For my still image mockup, I used my screen capture to create a blurred background, placed a semi-transparent square over it, pasted my screen capture on top, and added a drop shadow and text for some more dimension. Play around with the colors, layout, and text to create a design that’ll capture your dream clients’ attention.
To create a video mockup, I first chose a free laptop image from Canva’s photo library. Then, I dragged my video on top of the image, making sure to line up the video with the screen of the laptop.
Tip: Make sure the laptop, tablet, or phone in chosen stock image is facing directly at the camera. This will make it easier to line up your video edges and create a realistic mockup.
STEP 4: Export and share!
Once you’re happy with your design, it’s time to export!
For still images, export your design as a PNG (for a high-quality image) or a JPEG (for a lower-quality, smaller file).
For a standard video, export your design as an MP4. If you want your video to loop automatically, export it as a GIF.
Now, you’re ready to share your mockups with the world!
Want to attract your dream web design clients?
Here are a few more posts you may want to checkout next…
- Why You Shouldn’t Use Canva for Your ‘Link in Bio’ (Do This Instead!)
- How to Update Your Squarespace Browser Icon or Favicon (for Free With Canva)
Galen Mooney is the founder of Local Creative, a boutique web design studio crafting elevated websites for small business owners and creatives with a focus on connection, clarity, and growth. With over a decade of experience in design and SEO, she’s partnered with hundreds of creative brands to build custom Showit, Squarespace, and WordPress websites that build trust and momentum over time.

THANKS SO MUCH for this!! Really helpful! I’m struggling with the loom video however as it is too wide 🤷♀️. When I drag the corners to make it smaller it cuts off the edges of my page and just shows the middle section. What am I doing wrong?
Hello! You may just need to adjust the size of your browser window before recording. Ideally you want to cut off the bottom a bit and not the sides.