
Want a totally one-of-a-kind Squarespace site, but don’t want to end up elbow-deep in code? You’re in luck! One of my favorite tools, SquareKicker, is built for just that: creating stunning designs and animating elements for your website without any custom code.
Here’s how to get started with SquareKicker as a DIYer or web designer!
Special thanks to SquareKicker for sponsoring this video. If you’d like to try them out for yourself, be sure to use my affiliate link to start your free trial!
VIDEO TRANSCRIPT: How to Customize Your Squarespace Site Without Code Using SquareKicker
Have you ever wondered how people take their plain and boring Squarespace website and turn it into something that really stands out from the crowd?
You might be thinking there’s a lot of custom code behind the scenes that goes into making a Squarespace website, one of a kind, but today I’m going to share with you a tool that makes it a whole lot easier to customize your site. Even if you don’t know any code at all.
I’m Galen from Local Creative Co and I’m a web designer. And even though I love HTML and CSS and how you can use it to customize your website. I know not everybody wants to learn how to code from scratch.
You should still be able to make your website look and feel exactly how you want it to. And that’s why I’m excited to tell you about today’s video sponsor, SquareKicker
SquareKicker is a fully customizable design and animation extension for Squarespace 7.1. It helps you make your Squarespace website feel totally unique without touching a single line of code.
Even though this video was sponsored by SquareKicker , I was testing out their free trial and actually decided to upgrade my account with my own money to test it out for you today. So I could let you know the pros and the cons who it’s right for, and the types of design changes you can make with this really cool extension.
First, let’s talk about how you actually add a SquareKicker to your website.
You’re going to go to SquareKicker.com start your free trial, and it’s going
to give you step-by-step instructions for connecting your website to your SquareKicker account.
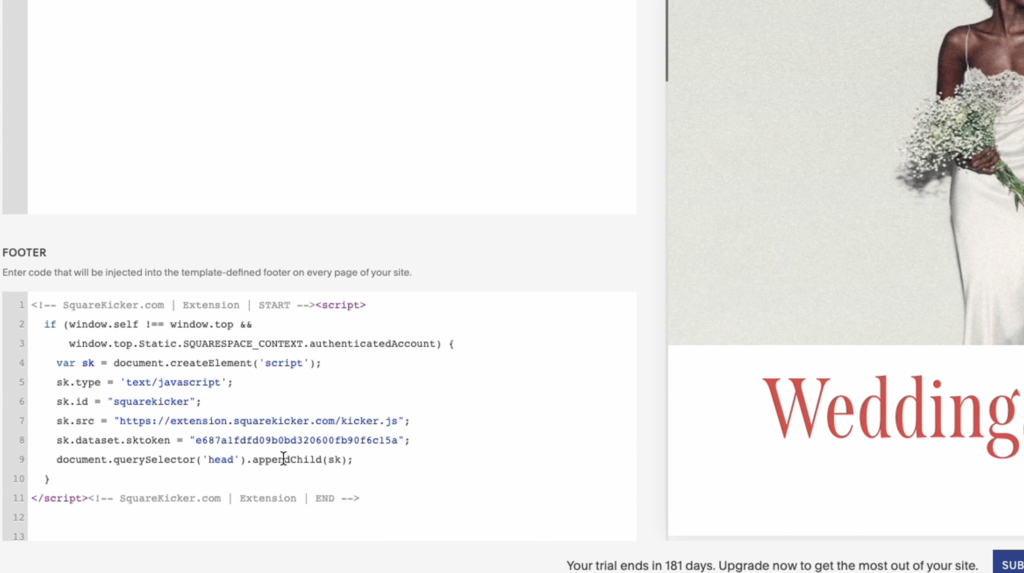
Once you’ve gone through those steps, SquareKicker is going to give you a few lines of code to add to the footer of your website.
To do that. You’re going to go to settings
then advanced,
then click on code injection
and paste that code right here in your footer.
One thing to keep in mind is that you need it to be on the business plan or higher for your Squarespace account in order for SquareKicker to work the personal plan.
Doesn’t allow you to use this code injection feature. So SquareKicker just won’t work with it, but the business plan or the commerce plan is going to be totally fine for you to use this extension.
Now that you’ve got SquareKicker installed properly.
You’re going to see the logo pop up and the top right corner of the page.
If you go into edit here, you’re also going to see the logo pop up. When you click on a section or any blocks within the page, whether it’s a text block or an image or anything else.
Each type of block has its own edits that go along with it.
So you can click on the block, click on the SquareKicker logo, and you’re going to see three tabs pop up here. The design tab, the advanced tab and the presets tab under the design tab, you’re going to see any design changes that you can make to this particular object.
Under advanced, you’re going to see some premium features that you can add on. And then under presets, this is a premium feature as well, but you’re actually able to save customizations that you’ve made to a specific block, so you can reuse them again and again, throughout your site, this is really handy for speeding up development.
One thing to keep in mind as you’re editing your website with SquareKicker is that SquareKicker actually creating CSS behind the scenes that targets the specific block IDs on your website. And if you’re totally confused by what that means, don’t really worry about it.
The only thing you need to know is that if you clone a page or clone a section of a page, those changes are not going to come along with you. That is why it’s really nice to have that preset feature. So if you make a design change to one element on your website, you can copy that and quickly add those same stylistic changes to other elements, too.
Let’s dive in so I can show you what SquareKicker is all about.
Let’s go to this section here and say, I want to give it a nice light pink background. I’m going to click on SquareKicker . I’m going to go to background and then section, and then I’m going to choose a custom color background. I know you can do this from the regular Squarespace style settings too, but I love being able to design as I edit the content on my page.
And this is just a little. Bit faster and almost easier than doing it through the style settings. So I’m going to hit apply here. It’s a pretty basic change. I think that looks good. And the cool thing is if I click the SquareKickers icon again, you’re going to see this little yellow dot appear next to the word background.
This is showing me that I have already made a change here, and I can either click this little arrow to revert the change, or I can go in and make additional changes if I want to customize that section further. The next thing I want to do is add a cool divider between this section and the section below it. We’re going to get a little bit fancier here as we go.
I’m going to click on divider. I’m going to choose a wave bottom divider. I think that looks kind of cool. And I’m going to adjust the color to be white. So it blends in with the section below it. Once I hit apply here, you can see how cool that section looks. You can do this with a little bit of finagling with something like Canva, Photoshop, or even adding your own custom CSS, but look how fast and easy that was to get the look and feel that I’m going for.
I’m going to add a little bit of. A spacer block here, just to kind of space this section out a little bit. You could also do that right in SquareKicker without using this spacer block and just move this block down a little bit. So I could, even if I wanted to, I could create more spacing this way and move it around. So I don’t even need this spacer block anymore.
Let’s get rid of this.
There we go. I think that looks pretty good. Then let’s go down to this section here. I’m going to take this image and I am going to let’s go to the image. Let’s rotate this a little bit, kind of make it a diagonal. That looks good. I’m going to go back. And then I also want to go back to design. I want to go to the block itself so you can edit the image. And then you could also edit the block, which is sort of like the container of the image. I’m going to go to this block here. I’m going to go to layout. And I am going to. Change the spacing a little bit. And see, I can actually move this up. Look how cool that looks. I can move this so that this little twinkle here, uh, falls on the border of the previous section. And as I do this, you can see that the text is staying still. I don’t mind that look, but if I wanted to, I could click this tethered elements option.
And as I move it, the whole section moves up. So kind of cool how I’m able to literally pixel by pixel. Pixel adjust where certain elements are showing up on the page. Let’s tweak this a little bit more. I think something like that looks pretty good. Let’s take this section here, make it a little smaller.
So as you can see, I do use a combination of the Squarespace style settings with the SquareKicker settings. And for me personally, I’ve used this on a few design projects with clients, and I’ll talk about the opportunities for designers later.
And when I do, because I know custom CSS, I use this in tandem with custom CSS. There’s certain things I will actually change in SquareKicker . There’s certain things I will change in the Squarespace CSS settings. That’s just my personal preference. You do not have to touch a line of code if you just, if you don’t want to, but it’s something I’m familiar with and something I enjoy. So I’ll do a little bit of both.
Let’s go down to this image block section here. There’s so many cool features inside of SquareKicker that you can do to your image block, or you can apply to your image block. So if I click on the image, same thing here, I can adjust the image, the text, the button, and the block. So every block within Squarespace, whether it’s an image block, a text block, they’re all going to have their own design and customization settings inside of SquareKicker . So with this image or with this image block here, I’m going to go into the block settings and layout. And I’m do the same thing. Turn on tethered elements, and I’m going to pull it up a little bit so that her picture kind of comes. Oops, I didn’t mean to move it horizontally. And I look, I can just undo that change if I didn’t like it. So say I was like, oh, I accidentally moved it way off the screen.
I can undo that change just by clicking that little back arrow there. But I’m able to kind of play around with and move this how I want to and breaking up the blockiness of a Squarespace website is one of the best ways to make it feel totally custom and unique to your business. So I’m going to hit apply there and I’m going to hit save. And you can see just how cool this site is starting to look just from those super simple changes I made with the SquareKicker tool.
Now let’s dive into a few of my favorite ways to use SquareKicker to create custom layouts for your website.
I’m going to click on the SquareKicker logo for this section here. I’m going to choose layout, and you’re going to see all these options for how you want to split the layout. You could do a hundred percent, which it is now 75 50. We’re going to choose 50% and you can see that section just jumped to half the page. Then I’m going to scroll down to the section below it. We’re going to click this one as well. Go to layout. She was 50% and now I have this really nice split side by side layout.
Let’s take this section here. We’re going to edit it. Go into background. At an image. We’re going to browse stock photos and let’s choose. I love houseplants. Let’s do like a nice houseplant image here. This one looks great add image.
It’s going to load and show on half the page here. And it’s going to fill that up. I’m going to move the layout a little bit, just to, I’m going to move this little, uh, focus circle here to make sure it’s focusing on the right part of the image.
Then I’m going to add some text on this side.
And I’m going to change this.
And let’s make this text. Small width. We can. Center it.
That’s starting to look good. Let’s actually make this section taller.
There we go. So now we’ve got some more space here and this is starting to come together, actually, really like how this layout looks.
Now I want to show you some of the more premium features. I’m going to start by adding a little bit of text here. Let’s go actually go into the SquareKicker settings for this and let’s make this text bigger. So I’m going to click on H two, because I believe this is an H two and I can actually just drag this to make text totally custom. So I can custom size this text to any size that I want. I’m going to make it about there. I’m going to hit apply. Then let’s go back into the settings for this section. And click on advanced and you can see there’s quite a few options here. I can add anchor links so that you’re able to link to specific sections on the page. I can create a sticky split, which I’m going to show you in just a second. I in great sticky sections and you can create some cool horizontal scrolling animation.
So let’s go into sticky split here. I’m going to choose whether I want it on the left side or the right side, and I want it on the left and I’m going to choose how many sections to include. And when I hit apply here, you’re going to see how cool this functionality is. Right.
So it’s allowing the left side to remain sticky while the right side scrolls.
Here’s an example of a client site where I did this. Recently you can see the right side is moving while the left side stands still. And then if I scroll down here, the opposite happens. The right side stands still on the left side scrolls. It just adds so much movement and it makes your site feel really, truly one of a kind.
Let’s go back to my example here. Everything is looking good, but if I click
on the mobile view, you’re going to see that that split is still happening. And I don’t love how this looks, especially if there’s a lot of text here, it’s going to look really crammed only taking up half the screen.
So if I go back to the desktop view and I click over to SquareKicker , I can see that over here on the left,
I have four different devices that I can design for the desktop, the laptop, the tablet, and. And the mobile device. And if I click
on the tablet, I’m actually able to customize the settings of every single block and every single section with the, or depending on the layout. So I am going to come into the layout here and I’m going to choose full width. Apply.
Let’s come down to this section, too. Same thing. We’re going to come to make sure it’s in tablet. We’re going to choose the layout options and choose full with again and apply.
And then let’s go back to the desktop view. And as you can see, it looks good here. And if I go to the mobile view, they’re both full with again. So we fixed it just by editing the styles based on the device size.
I hope you enjoyed that behind the scenes look at SquareKicker . Now I’m going to answer some questions that came up that I had when I was first looking at SquareKicker that I think you’re probably wondering too.
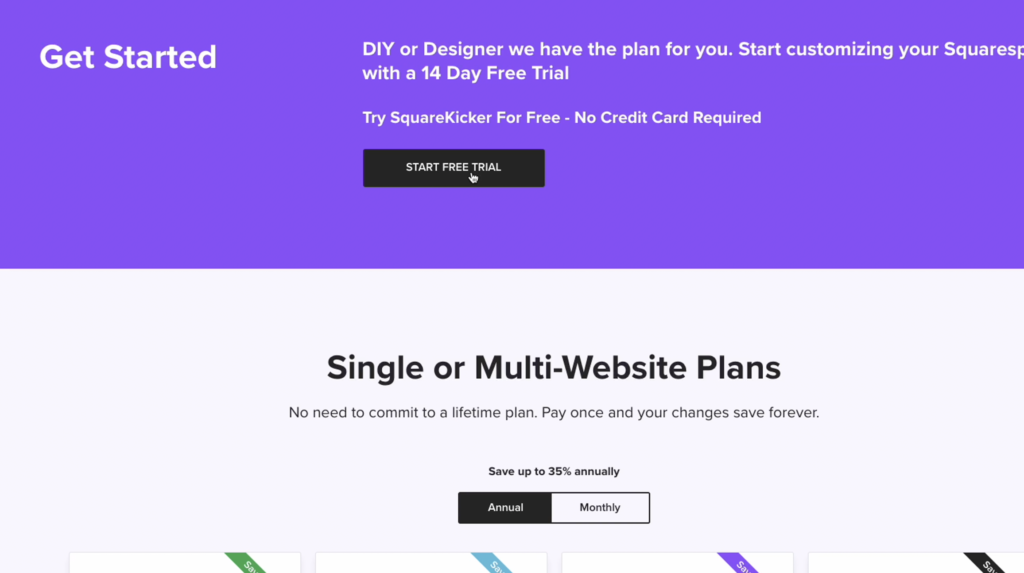
The first is how do their pricing and plans work? If you’re a designer versus somebody who’s just trying to customize their own Squarespace website.
You can take a look at the details of what’s included in each plan on your own time. But I did want to go over the difference between their basic and pro plan as well as their desire plan.
The best way to decide which SquareKicker plan is going to be the right fit for you is really based on whether you’re designing a single website or whether you’re going to be using SquareKicker for your web design clients.
With the basic and pro plans, you can only edit one website per subscription.
You could have multiple subscriptions under one account, but price wise, if you’re going to be editing more than a few websites, it makes more sense to sign up for the designer plan. With the designer plan, you can have 10 active websites at any one time and cycle websites between active and inactive, depending on which ones, your working on.
Something I was wondering when I first saw SquareKicker was whether or not the changes would stay after you canceled your subscription and stopped paying for their tool.
I’m excited to tell you that the answer is yes, the changes do stay. Even if you’re not actively paying for your monthly subscription.
You do still want to keep SquareKicker installed on your site though. And just keep in mind that even though those changes stay, you won’t be able to make any adjustments to those changes without reactivating your subscription in the future.
That’s the major benefit of the designer plan. If you’re working on multiple sites at one time, instead of having to constantly cancel and reactivate your subscriptions, you can cycle sites in and out of your active list, depending on which ones you’re working on.
I think SquareKicker is perfect for the DIY designer who wants to customize their website and give it that little extra something without taking a full on web design course. .
It’s also a super powerful tool for professional designers who want to speed up their workflow and add custom elements to their clients’ sites without having to constantly Google, how to make it happen.
If you enjoy this video, make sure to subscribe and let me know in the comments. If you’ll be checking out SquareKicker, free trial for yourself, I’d love to hear your thoughts.
Thanks so much for watching and I’ll see you in the next video.
What Is SquareKicker & How Does It Work?
SquareKicker is a design and animation extension for Squarespace 7.1 that allows you to make your website feel totally unique without using custom code. It works by adjusting the code on the backend while you make your design changes in real time.
Whether you’re DIYing your own site without any coding knowledge or you’re a designer looking to speed up your workflow, I can’t recommend SquareKicker highly enough.
How to Install SquareKicker on Squarespace
Installing SquareKicker is quick and easy. Just remember that you’ll need the Squarespace Business Plan or above to use this extension.
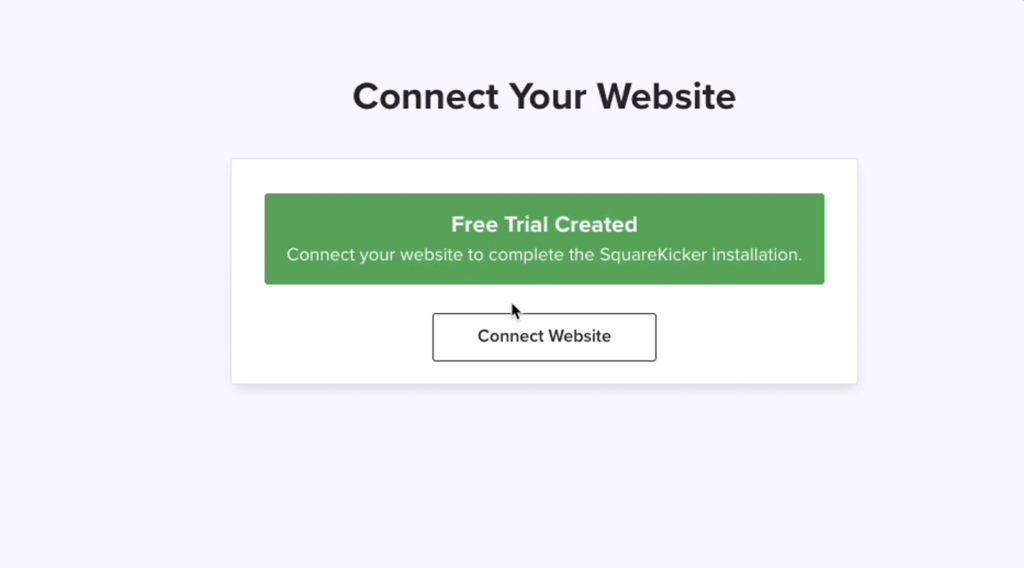
STEP 1: Create a SquareKicker account.
First, visit the SquareKicker to start your free trial and create your account.
STEP 2: Connect it to your Squarespace account.
Next, connect your SquareKicker account to your Squarespace account.
STEP 3: Paste the provided code in your footer.
Finally, paste the code provided into the footer of your Squarespace site. You can do that by opening your Squarespace editor, clicking SETTINGS > ADVANCED > CODE INJECTION > and then pasting the code in.
Without this code, the extension won’t work on your site, so be sure to complete this step. It’s the last bit of code you’ll need to touch!
STEP 4: Get creative!
And just like that, you’re ready to start using SquareKicker on your site! When you hover over a block or section, you’ll see the SquareKicker icon in the toolbar on the far right. Click it, and start playing around with all the cool customizations and features!

How to Use SquareKicker As a Web Designer
So what if you want to use SquareKicker for your clients’ sites, not just your own? You’re in luck! SquareKicker was created with web designers in mind.
First, switch to the Designer Plan. Unlike the Basic or Professional Plans which only allow you to edit one site at a time, the Designer Plan lets you use SquareKicker on up to 10 websites at once. You can cycle client sites between active and inactive so you don’t exceed that 10-website limit. It’s easy to swap out sites anytime.
Next, be sure to leave the footer code in the sites you deliver. Even after you or your client stops paying for SquareKicker, the edits will stay put. You just won’t be able to make any more changes to them without re-starting your SquareKicker subscription.
Want to make your or your clients’ Squarespace sites are totally one-of-a-kind?
Be sure to try SquareKicker, and check out these blog posts next for more Squarespace tips…
- How to Embed Your HoneyBook Contact Form on Your Website (Squarespace + Showit Tutorial)
- How to Remove Headers in Squarespace
- Why You Shouldn’t Use Canva for Your ‘Link in Bio’ (Do This Instead!)

Galen Mooney is the founder of Local Creative, a boutique web design studio crafting elevated websites for small business owners and creatives with a focus on connection, clarity, and growth. With over a decade of experience in design and SEO, she’s partnered with hundreds of creative brands to build custom Showit, Squarespace, and WordPress websites that build trust and momentum over time.

Hey Galen! Playing around with the free trial, and this basically is doing everything I had wished I knew how to do all along. But… just so I know, is there any way around having to basically design/tweak 4 different site layouts? I design on the Desktop layout, but then am having to go through the remaining 3 layouts to ensure it looks ok. As well, if you change the layout on the Desktop layout, will that alter the remaining 3 layouts again? Obvs SK saves time in needing to find code, etc. But at least then Squarespace would usually create an ok Mobile view automatically. Thank you so much for sharing this!
That is a great question! I believe you do have to design all four layouts if the designs you create for desktop don’t work well on smaller screens. The good thing is it’s easy to undo changes for smaller screens but clicking the little undo arrow next to each item in the list. Then if you want to repeat that element throughout the site you can save the style changes as a preset to save time. I will mention this to SquareKicker though because it would be great to be able to make changes only for desktop for example.
Love the video, and perfect timing! I just started using Squarekicker and I really love it! Just curious about your process–do you design your site first just using Squarespace options, and then go in and add the Squarekicker features afterwards? Or do you work on one section at a time using both?
Thank you!
Hi Shelly – I use both at the same time, but I try to make note of what I edited in SquareKicker and what I did with css/style settings so that way I can make sure the client knows what they can edit themselves. I don’t want to assume my client is going to pay for SquareKicker, I actually assume the opposite so I try to only use it for design elements that won’t be changed often if at all, or I discuss with the client ahead of time. Hope that helps!